Difference between revisions of "Simple Platform"
(→Collectables) |
(→Collectables) |
||
| Line 402: | Line 402: | ||
==Collectables== | ==Collectables== | ||
| − | Load your map again in Tiled, this time create | + | Load your map again in Tiled, this time within the objects layer create 3 new objects for the coins. I have created 3 new objects called Coin1 , Coin2 , and Coin 3. I have also set the type to Coin and the height & width of each object to 16 pixels: |
[[File:Plat coin objects.gif]] | [[File:Plat coin objects.gif]] | ||
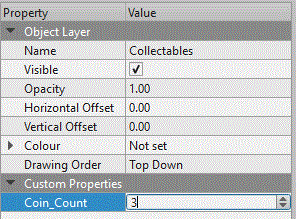
| − | Now, click on the | + | Now, click on the Object layer and in the properties panel add a custom property (+ symbol in bottom left corner). Make an integer called Coin_Count: |
[[File:Coin Count.gif]] | [[File:Coin Count.gif]] | ||
Revision as of 14:22, 27 November 2017
This will show you how to create a platform game using a tiled map, and tile based collision detection.
Contents
Create Map
Tiled
You will firstly need to install the Tiled program from the website and link below. In college the Tiled executeables are on moodle, under project, technical skill, monogame, and tiled. I have also added links to other tutorials for using Tiled.
Tiled Website and Download
Tutorials for using Tiled
Written Version of Above Tutorials
New Tiled Map
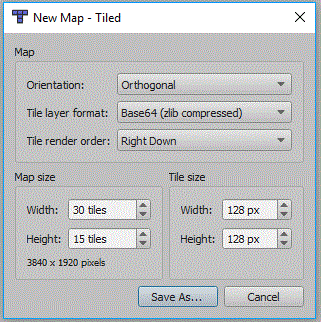
You will need a new tiled map, the tile size in the screen shot is 128 pixels, in the end i actually changed this to 32 x 32 and resized the tiles accordingly:
It is important to change the format of the map to Base64 gzip compressed:
File:Plat tile layer format.gif
Add Tile Set
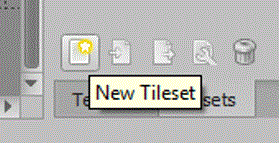
Now your map is created we need to add a tile set:
In creating this tutorial i first tried a tileset based upon a collection of images, this seemed fine in Tiled but failed to draw using Square.Tiled. So make sure you choose embed and based on tileset image:
Draw Your Level
Now you have a tile set build a simple set of platforms. You should rename the layer to something like Tiles:
Add Player Object
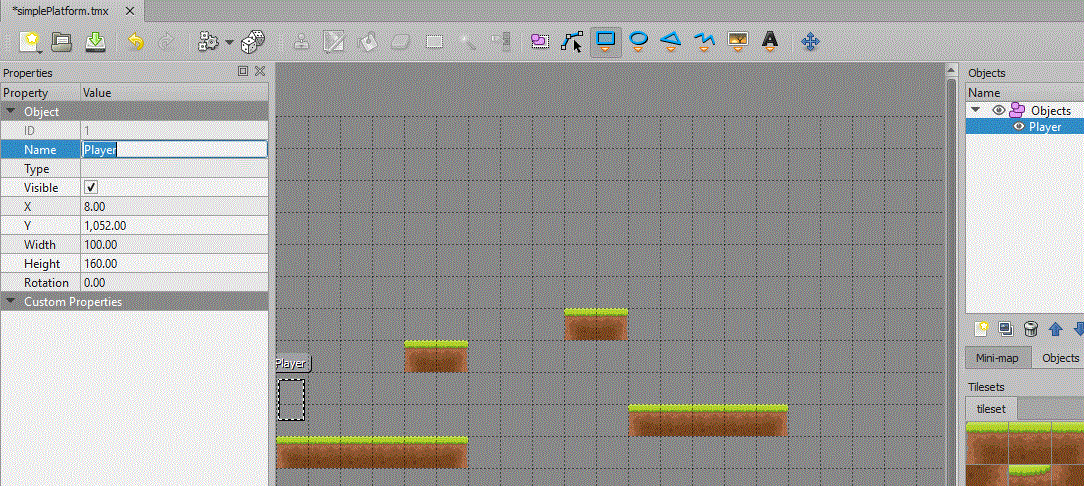
Now you have a section of platforms, we can now set the position of the player. This will also be the object moved by the code and player input. So insert an object layer, and then use the rectangle tool to create the object. My final player was 60 pixels high and 40 pixels wide:
MonoGame Project
Create a new MonoGame project, mine is a Windows project.
Setup Square.Tiled
If you have a project ready, create a new class in your project. Click project and new class and call it Tiled.cs, then copy the code from this document over the code in your new class: Square.Tiled Class
Remember to set the name space to Squared.Tiled.
You will need to add references in the using section for the following:
using System.IO;
using Squared.Tiled;
Code to Display Map
Map Variables
At the top of your Game1 class add these additional variables:
Map map;
Layer collision;
Vector2 viewportPosition;
int tilePixel;
LoadContent for map
In the LoadContent method add the following lines to load the map, the collision layer and to set the texture of the player. The variable tilepixel assumes your tiles are square, the number of pixels is taken from the map:
map = Map.Load(Path.Combine(Content.RootDirectory, "SimplePlatform.tmx"), Content);
collision = map.Layers["Tiles"];
tilePixel = map.TileWidth;
map.ObjectGroups["objects"].Objects["Player"].Texture = Content.Load<Texture2D>("hero");
The Update Method
You will also need to update the viewportPosition, this will center the map onto the player:
viewportPosition= new Vector2(map.ObjectGroups["objects"].Objects["Player"].X - (graphics.PreferredBackBufferWidth/2), map.ObjectGroups["objects"].Objects["Player"].Y - (graphics.PreferredBackBufferHeight/2));
The Draw Method
Add the following to the draw method to draw the map and hero to the screen.
If you already have spriteBatch.Begin() or spriteBatch.End() then just place the middle line inbetween your lines.
spriteBatch.Begin();
map.Draw(spriteBatch, new Rectangle(0, 0, GraphicsDevice.Viewport.Width, GraphicsDevice.Viewport.Height), viewportPosition);
spriteBatch.End();
At this point your project should run an display your map centered onto the player.
Falling
In a platformer, the first thing you want to program is the falling logic, because you need to be able to land on a platform. To do this create a new method called CheckGround. This method should accept an integer for speed, because i want to check ground only when the player is falling and not jumping up. This method will return an integer for the number of overlapping pixels, we can then adjust the players position:
public int CheckGround(int speed)
        {
            int temp = 0, temp1 = 0;

            if (speed > 0)
            {

            }

            //return largest y collision overlap
            if (temp < temp1)
                return temp;
            else
                return temp1;
        }
The if statement above is to only check for ground when the player is falling, speed would be negative if the player was moving up the screen. The two variables temp & temp1 will be used to calculate the number of pixels the player overlaps the tile on the bottom left and bottom right corners. So we first need to get the exact coordinates for these corners:
public int CheckGround(int speed)
        {
            int temp = 0, temp1 = 0;

            if (speed > 0)
            {
                //get exact coordinates for each corner
                Vector2 lb = new Vector2(map.ObjectGroups["Objects"].Objects["Player"].X,
                    map.ObjectGroups["Objects"].Objects["Player"].Y + map.ObjectGroups["Objects"].Objects["Player"].Height);
                Vector2 rb = lb+ new Vector2( map.ObjectGroups["Objects"].Objects["Player"].Width,0);
            }

            //return largest y collision overlap
            if (temp < temp1)
                return temp;
            else
                return temp1;

        }
Now we need to work out which tile the player is on, this can be done by dividing the X & Y by the tilePixel. We can use these to get the tile value for this tile. If the tile value is 0 then no tile exists on that part of the map. If a tile is present, we need to workout how much the player overlaps the tile, this is then passed back to move the player this number of pixels:
public int CheckGround(int speed)
        {
            int temp = 0, temp1 = 0;

            if (speed > 0)
            {
                //get exact coordinates for each corner
                Vector2 lb = new Vector2(map.ObjectGroups["Objects"].Objects["Player"].X,
                    map.ObjectGroups["Objects"].Objects["Player"].Y + map.ObjectGroups["Objects"].Objects["Player"].Height);
                Vector2 rb = lb+ new Vector2( map.ObjectGroups["Objects"].Objects["Player"].Width,0);

                //check left bottom
                int tile = collision.GetTile((int)lb.X / tilePixel, (int)lb.Y / tilePixel);
                if (tile != 0)
                {
                    temp = (((int)lb.Y / tilePixel) * tilePixel) - (int)lb.Y;
                }

            }

            //return largest y collision overlap
            if (temp < temp1)
                return temp;
            else
                return temp1;

        }
The temp calculation above works out the top position of the tile, the (int) casting removes any partial tiles in the calculation.
Finally we need to check the other corner, to complete our CheckGround method:
public int CheckGround(int speed)
        {
            int temp = 0, temp1 = 0;

            if (speed > 0)
            {
                //get exact coordinates for each corner
                Vector2 lb = new Vector2(map.ObjectGroups["Objects"].Objects["Player"].X,
                    map.ObjectGroups["Objects"].Objects["Player"].Y + map.ObjectGroups["Objects"].Objects["Player"].Height);
                Vector2 rb = lb+ new Vector2( map.ObjectGroups["Objects"].Objects["Player"].Width,0);

                //check left bottom
                int tile = collision.GetTile((int)lb.X / tilePixel, (int)lb.Y / tilePixel);
                if (tile != 0)
                {
                    temp = (((int)lb.Y / tilePixel) * tilePixel) - (int)lb.Y;
                }

                //check right bottom
                tile = collision.GetTile((int)rb.X / tilePixel, (int)rb.Y / tilePixel);
                if (tile != 0)
                {
                    temp1 = (((int)rb.Y / tilePixel) * tilePixel) - (int)rb.Y;
                }
            }

            //return largest y collision overlap
            if (temp < temp1)
                return temp;
            else
                return temp1;

        }
Using CheckGround
In the Game1.cs create the following variables:
        int speed = 4;
        bool onGround = false;
Now in the update method add the following code:
            if (!onGround)
            {
                speed++;
            }

            map.ObjectGroups["Objects"].Objects["Player"].Y = map.ObjectGroups["Objects"].Objects["Player"].Y + (speed);

            int CheckY = CheckGround(speed);

            if (CheckY != 0)
            {
                onGround = true;
                map.ObjectGroups["Objects"].Objects["Player"].Y = map.ObjectGroups["Objects"].Objects["Player"].Y + CheckY;
            }
            else
                onGround = false;
This code keeps adding to the speed to make the player fall faster, the movement is applied by adding speed to the current Y value. We then check if we have collided with a tile. If we have collided with a tile we set onGround to be true and correct the Y coordinate of the player.
At this point you should be able to test your game, the playing character should fall to the platform below and stay on top of the platform.
Jumping
Jumping should be straight forward, we are going to prevent multiple jumps by counting how many times the player has jumped since the player was last on the ground. To do this we need to declare a new variable in the Game1.cs:
int jumpCount = 0;
Now in the update method add the following to jump everytime the space bar is pressed:
            if (Keyboard.GetState().IsKeyDown(Keys.Space))
            {
                if (jumpCount <= 1)
                {
                    Console.WriteLine("jump " + jumpCount);
                    speed = -16;
                    jumpCount++;
                }
             }
The jump works by setting speed to a minus value, the previous code will keep adding 1 to this so that the jump will eventually be a fall. The jumpCount should restrict you to a double jump.
Now we need to change the if statement in the update method to:
            if (CheckY != 0)
            {
                onGround = true;

                jumpCount = 0;
            }
            else
                onGround = false;
This resets the jumpCount everytime we land on a tile.
Moving Left or Right
To move left or right add the following to the update method of Game1.cs:
            if (Keyboard.GetState().IsKeyDown(Keys.Z))
            {
                map.ObjectGroups["Objects"].Objects["Player"].X -= 3;
            }

            if (Keyboard.GetState().IsKeyDown(Keys.X))
            {
                map.ObjectGroups["Objects"].Objects["Player"].X += 3;
            }
This should work at this point, however we don't check for collisions with any tiles, this will not be blocked by any tiles. So we need to check if we have collided with a tile on the left and right.
I have used the same logic as CheckGround, ie to check each corner and work out how many pixels the character overlaps by. This can then be used to adjust the X position of the player.
public int CheckLeft()
        {
            int temp = 0, temp1 = 0;

            //get exact coordinates for each corner
            Vector2 lt = new Vector2(map.ObjectGroups["Objects"].Objects["Player"].X, map.ObjectGroups["Objects"].Objects["Player"].Y);
            Vector2 lb = lt + new Vector2(0, map.ObjectGroups["Objects"].Objects["Player"].Height -1);

            //check left Top
            int tile = collision.GetTile((int)lt.X / tilePixel, (int)lt.Y / tilePixel);
            if (tile != 0)
            {
                temp = (((int)lt.X / tilePixel) * tilePixel) - (int)lt.X;
            }

            //check left bottom
            tile = collision.GetTile((int)lb.X / tilePixel, (int)lb.Y / tilePixel);
            if (tile != 0)
            {
                temp1 = (((int)lb.X / tilePixel) * tilePixel) - (int)lb.X;
            }

            if (temp < temp1)
                return temp;
            else
                return temp1;
        }
And also this for the CheckRight:
public int CheckRight()
        {
            int temp = 0, temp1 = 0;
            //get exact coordinates for each corner
            Vector2 rt = new Vector2(map.ObjectGroups["Objects"].Objects["Player"].X + map.ObjectGroups["Objects"].Objects["Player"].Width,
                map.ObjectGroups["Objects"].Objects["Player"].Y);
            Vector2 rb = rt + new Vector2(0, map.ObjectGroups["Objects"].Objects["Player"].Height-1);

            //check Right Top
            int tile = collision.GetTile((int)rt.X / tilePixel, (int)rt.Y / tilePixel);
            if (tile != 0)
            {
                temp = (((int)rt.X / tilePixel) * tilePixel) - (int)rt.X;
            }

            //check right bottom
            tile = collision.GetTile((int)rb.X / tilePixel, (int)rb.Y / tilePixel);
            if (tile != 0)
            {
                temp1 = (((int)rb.X / tilePixel) * tilePixel) - (int)rb.X;
            }

            if (temp<temp1)
                return temp;
            else
                return temp1;
        }
Using CheckRight & CheckLeft
In the Update method of Game1.cs, change the code to move the player left and right to make it the following:
            int CheckX = 0;
            if (Keyboard.GetState().IsKeyDown(Keys.Z))
            {
                map.ObjectGroups["Objects"].Objects["Player"].X -= 3;
                if (CheckLeft() != 0)
                    CheckX = 3;
            }

            if (Keyboard.GetState().IsKeyDown(Keys.X))
            {
                map.ObjectGroups["Objects"].Objects["Player"].X += 3;
                if (CheckRight()!=0)
                    CheckX = -3;
            }
We move the player by 3 pixels, so once moved check if this overlaps the tile. If it does set checkX which is then used to undo the move by adding this code after the two if statements above:
map.ObjectGroups["Objects"].Objects["Player"].X = map.ObjectGroups["Objects"].Objects["Player"].X + CheckX;
You should now have a game which allows you to move, jump and land on platforms, test it and try out the movement.
Collectables
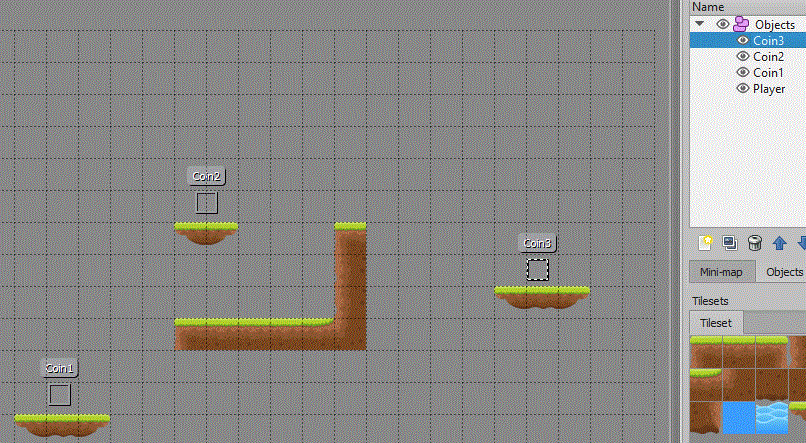
Load your map again in Tiled, this time within the objects layer create 3 new objects for the coins. I have created 3 new objects called Coin1 , Coin2 , and Coin 3. I have also set the type to Coin and the height & width of each object to 16 pixels:
Now, click on the Object layer and in the properties panel add a custom property (+ symbol in bottom left corner). Make an integer called Coin_Count:
Texture2D Declarations
We need to declare two Texture2D variables in the declaration section of Game1.cs:
Texture2D coinTexture, blankTexture;
LoadContent
Now we can add the code to load the texture and to apply the texture to each object. We use the Coin_Count custom property to loop through each coin. The naming for the coins use the prefix "Coin_" followed by a number, so we can create the names within the loop:
            coinTexure = Content.Load<Texture2D>("Coin");
            blank = Content.Load<Texture2D>("Transparent");

            int coinCount = Convert.ToInt32(map.ObjectGroups["Collectables"].Properties["Coin_Count"]);
            for (int i = 1; i <= coinCount; i++)
            {
                map.ObjectGroups["Collectables"].Objects["Coin_"+i].Texture = coinTexture;
            }
A blank texture is required so that it can be used to remove the coin texture once it has been collected. You can use this image for your blank texture:
![]() <--- it is here, remember its transparent.
<--- it is here, remember its transparent.
Now your collectables should be visible when you run your project.
Checking Collectables
Create a new method called CheckCoins, this method will need to accept a rectangle to represent the bounds of the player:
        public void CheckCoins(Rectangle player)
        {

        }
we need to get the number of coins from the Coin_Count property in the map. We can then use this in a for loop. The loop gets the coin from the map, and then creates a rectangle to represent its bounds:
        public void CheckCoins(Rectangle player)
        {
            int coinCount = Convert.ToInt32(map.ObjectGroups["Collectables"].Properties["Coin_Count"]);
            for (int i = 1; i <= coinCount; i++)
            {
                var coin = map.ObjectGroups["Collectables"].Objects["Coin_" + i];
                Rectangle coinRec = new Rectangle(coin.X, coin.Y, coin.Width, coin.Height);

            }
        }
Now we have the two rectangles required to check for a collision between the player & the coin. If a collision occurs the code writes the output to the console and sets the texture of the coin to the blank texture.
        public void CheckCoins(Rectangle player)
        {
            int coinCount = Convert.ToInt32(map.ObjectGroups["Collectables"].Properties["Coin_Count"]);
            for (int i = 1; i <= coinCount; i++)
            {
                var coin = map.ObjectGroups["Collectables"].Objects["Coin_" + i];

                Rectangle coinRec = new Rectangle(coin.X, coin.Y, coin.Width, coin.Height);
                if (player.Intersects(coinRec))
                {
                    Console.WriteLine("collision - " + i);
                    coin.Texture = blankTexure;
                }
            }
        }
Now add the code to run CheckCoins in the Update method of Game1.cs, This gets the player, creates a rectangle for the player, and then pass this rectangle to CheckCoins:
            var p = map.ObjectGroups["Objects"].Objects["Player"];
            Rectangle playerRec = new Rectangle(p.X, p.Y, p.Width, p.Height);
            CheckCoins(playerRec);
You should now be able to collide with the coins, and they will then dissappear.
CheckCoin Improvements
The CheckCoin method should ignore coins with a texture set to the blankTexture so:
        public void CheckCoins(Rectangle player)
        {
            int coinCount = Convert.ToInt32(map.ObjectGroups["Collectables"].Properties["Coin_Count"]);
            for (int i = 1; i <= coinCount; i++)
            {
                var coin = map.ObjectGroups["Collectables"].Objects["Coin_" + i];
                if (coin.Texture != blankTexture)
                {
                    Rectangle coinRec = new Rectangle(coin.X, coin.Y, coin.Width, coin.Height);
                    if (player.Intersects(coinRec))
                    {
                        Console.WriteLine("collision - " + i);
                        coin.Texture = blankTexture;
                    }
                }
            }
        }
