Difference between revisions of "PyGame RPG"
(→Key Unlocks Door) |
(→Install PyTMX) |
||
| (13 intermediate revisions by the same user not shown) | |||
| Line 1: | Line 1: | ||
| − | This tutorial will create a Tiled map based RPG game, which uses a collision layer within your map to control where the player can go. It will also show you how to create an objects layer for the player, and also collectables. | + | This tutorial will create a Tiled map based RPG game, which uses a collision layer within your map to control where the player can go. It will also show you how to create an objects layer for the player, and also collectables. '''If you wanted to create this for your project you should make it Object Oriented.''' |
=Creating the Map= | =Creating the Map= | ||
| Line 36: | Line 36: | ||
[[File:Tileset.gif]] | [[File:Tileset.gif]] | ||
| − | Your tileset can be individual images, it is more usual for them to be on a single tileset image | + | Your tileset can be individual images, it is more usual for them to be on a single tileset image and i would choose to embed the tileset. Some tileset images might also use a margin or spacing between each tile, this screen will allow you to set these if needed. |
===Map Layers=== | ===Map Layers=== | ||
| Line 71: | Line 71: | ||
Select Packages and search for PyTMX, this page will show you how to use PyTMX. Other TMX solutions exist and i will overtime have a look to see which are the best. | Select Packages and search for PyTMX, this page will show you how to use PyTMX. Other TMX solutions exist and i will overtime have a look to see which are the best. | ||
| + | |||
| + | If you are on your own machine, you can install PyTMX by typing into the command line: | ||
| + | |||
| + | python pip install pytmx | ||
==Import PyTMX== | ==Import PyTMX== | ||
| Line 83: | Line 87: | ||
==Read in Map== | ==Read in Map== | ||
| − | Make sure your map is within the same folder as your code, and that your tileset image is also in the same folder. | + | Make sure your map is within the same folder as your code, and that your tileset image is also in the same folder. Obviously make sure you change the name to your tmx file: |
<syntaxhighlight lang=python> | <syntaxhighlight lang=python> | ||
| − | tiled_map = load_pygame(' | + | tiled_map = load_pygame('SimpleRPG.tmx') |
tilewidth = tiled_map.tilewidth | tilewidth = tiled_map.tilewidth | ||
tileheight = tiled_map.tileheight | tileheight = tiled_map.tileheight | ||
| Line 94: | Line 98: | ||
<syntaxhighlight lang=python> | <syntaxhighlight lang=python> | ||
| − | tiled_map = load_pygame(' | + | tiled_map = load_pygame('SimpleRPG.tmx', pixelalpha=True) |
</syntaxhighlight> | </syntaxhighlight> | ||
| Line 108: | Line 112: | ||
#Player image | #Player image | ||
player = pygame.image.load(os.path.join("hero.png")).convert_alpha(); # load in coin image, convert_alpha will keep transparent background | player = pygame.image.load(os.path.join("hero.png")).convert_alpha(); # load in coin image, convert_alpha will keep transparent background | ||
| − | player = pygame.transform.scale(player, (20, 30)) # resize | + | player = pygame.transform.scale(player, (20, 30)) # resize player image, this should be the same size as the map object |
</syntaxhighlight> | </syntaxhighlight> | ||
| Line 154: | Line 158: | ||
==Move Player in Map== | ==Move Player in Map== | ||
| − | In the game loop we need to check which keys are pressed. We can create a structure to store the movement (pos), this is reset every iteration. We can | + | In the game loop we need to check which keys are pressed. We can create a structure to store the movement (pos), this is reset every iteration. We can then alter the position of the object by adding pos to the current position: |
<syntaxhighlight lang=python> | <syntaxhighlight lang=python> | ||
| Line 163: | Line 167: | ||
sys.exit() | sys.exit() | ||
| − | + | PRESSED = pygame.key.get_pressed() | |
| − | + | ||
| − | + | if PRESSED[pygame.K_LEFT]: | |
| − | + | pos[0]-=10 | |
| − | + | elif PRESSED[pygame.K_RIGHT]: | |
| − | + | pos[0]+=10 | |
| − | + | if PRESSED[pygame.K_UP]: | |
| − | + | pos[1]-=10 | |
| − | + | elif PRESSED[pygame.K_DOWN]: | |
| − | + | pos[1]+=10 | |
tiled_map.get_object_by_name("Player").x += pos[0] | tiled_map.get_object_by_name("Player").x += pos[0] | ||
| Line 179: | Line 183: | ||
=Checking Player Bounds= | =Checking Player Bounds= | ||
| − | + | Earlier you added a line to read the collision layer from the map: | |
<syntaxhighlight lang=python> | <syntaxhighlight lang=python> | ||
| Line 209: | Line 213: | ||
<syntaxhighlight lang=python> | <syntaxhighlight lang=python> | ||
| − | + | PRESSED = pygame.key.get_pressed() | |
| − | + | ||
| − | + | if PRESSED[pygame.K_LEFT]: | |
| − | + | pos[0]-=10 | |
| − | + | elif PRESSED[pygame.K_RIGHT]: | |
| − | + | pos[0]+=10 | |
| − | + | if PRESSED[pygame.K_UP]: | |
| − | + | pos[1]-=10 | |
| − | + | elif PRESSED[pygame.K_DOWN]: | |
| − | + | pos[1]+=10 | |
</syntaxhighlight> | </syntaxhighlight> | ||
| Line 224: | Line 228: | ||
<syntaxhighlight lang=python> | <syntaxhighlight lang=python> | ||
| − | + | PRESSED = pygame.key.get_pressed() | |
| − | |||
| − | |||
| − | |||
| − | |||
| − | |||
| − | |||
| − | |||
| − | |||
| − | |||
| − | + | if PRESSED[pygame.K_LEFT]: | |
| − | + | pos[0]-=10 | |
| − | + | elif PRESSED[pygame.K_RIGHT]: | |
| − | + | pos[0]+=10 | |
| − | + | if PRESSED[pygame.K_UP]: | |
| − | + | pos[1]-=10 | |
| + | elif PRESSED[pygame.K_DOWN]: | ||
| + | pos[1]+=10 | ||
| + | |||
| + | #Create rectangle for the player | ||
| + | x = tiled_map.get_object_by_name("Player").x+pos[0] | ||
| + | y = tiled_map.get_object_by_name("Player").y+pos[1] | ||
| + | w = tiled_map.get_object_by_name("Player").width | ||
| + | h = tiled_map.get_object_by_name("Player").height | ||
| + | playerrec = pygame.Rect([x,y,w,h]) | ||
#Check player rectangle with tiles | #Check player rectangle with tiles | ||
| Line 335: | Line 339: | ||
</syntaxhighlight> | </syntaxhighlight> | ||
| − | now we need to draw the key if it is visible, so find the code which draw players and | + | now we need to draw the key if it is visible, so find the code which draw players and coins. It should be similar to this: |
<syntaxhighlight lang=python> | <syntaxhighlight lang=python> | ||
| Line 368: | Line 372: | ||
</syntaxhighlight> | </syntaxhighlight> | ||
| − | now we need to draw the door if it is visible, so find the code which draw players, key, and | + | now we need to draw the door if it is visible, so find the code which draw players, the key, and coins. It should be similar to this: |
<syntaxhighlight lang=python> | <syntaxhighlight lang=python> | ||
| Line 474: | Line 478: | ||
==Key Unlocks Door== | ==Key Unlocks Door== | ||
| − | At the moment the main thing preventing the player from leaving the map are the bounds we have in the collision layer. So we will get the the position of the door, find the tiles it is over and remove them from the collision layer and | + | At the moment the main thing preventing the player from leaving the map are the bounds we have in the collision layer. So we will get the the position of the door, find the tiles it is over and remove them from the collision layer, and finally we need to make the door invisible. Firstly find the checkkey method, it should be something like this: |
<syntaxhighlight lang=python> | <syntaxhighlight lang=python> | ||
| Line 482: | Line 486: | ||
if (itemrec.colliderect(playerrec) and (item.visible!=0) and (item.type=="Key")): | if (itemrec.colliderect(playerrec) and (item.visible!=0) and (item.type=="Key")): | ||
item.visible=0 | item.visible=0 | ||
| − | <syntaxhighlight> | + | </syntaxhighlight> |
We now need to do more than just hide the key. This creates a rectangle for the door, and then finds all tiles in the collision layer which collide with the rectangle. These tiles are then removed so they won't be used by checkbounds anymore. Finally we need to make the door graphic invisible: | We now need to do more than just hide the key. This creates a rectangle for the door, and then finds all tiles in the collision layer which collide with the rectangle. These tiles are then removed so they won't be used by checkbounds anymore. Finally we need to make the door graphic invisible: | ||
Latest revision as of 15:06, 21 January 2021
This tutorial will create a Tiled map based RPG game, which uses a collision layer within your map to control where the player can go. It will also show you how to create an objects layer for the player, and also collectables. If you wanted to create this for your project you should make it Object Oriented.
Contents
[hide]Creating the Map
Tiled
You will firstly need to install the Tiled program from the website and link below. In college the Tiled executeables are on moodle, under project, technical skill, monogame, and tiled. I have also added links to other tutorials for using Tiled.
Tiled Website and Download
Tutorials for using Tiled
Written Version of Above Tutorials
Create a Map in Tiled
Map Settings
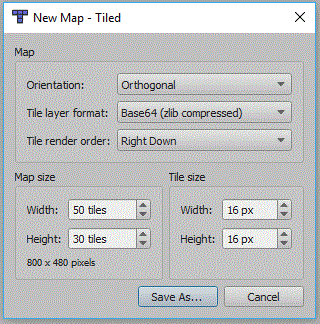
You will need to create a new map in tiled, the settings window below should be displayed:
The Tile size will need to match the tile size of your tileset. You can also specify the number of tiles in your your map, this and the tile size will create a map of a given size in pixels. You should be able to leave everything else the same.
Tileset
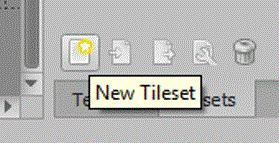
Now to import the tileset, i'm using one of the 16x16 dungeon tileset on the project page of the computer science moodle page. If you are using a different tileset you may need to set a different tile height and width. To import a tileset you need to click the New Tileset icon in the bottom right corner:
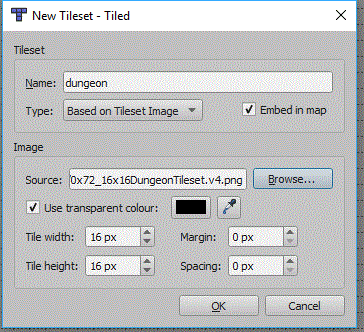
Now the new tileset panel will appear:
Your tileset can be individual images, it is more usual for them to be on a single tileset image and i would choose to embed the tileset. Some tileset images might also use a margin or spacing between each tile, this screen will allow you to set these if needed.
Map Layers
Your map should already have a layer called Map Layer 1, use the new layer button to also add another tile layer and then an object layer:
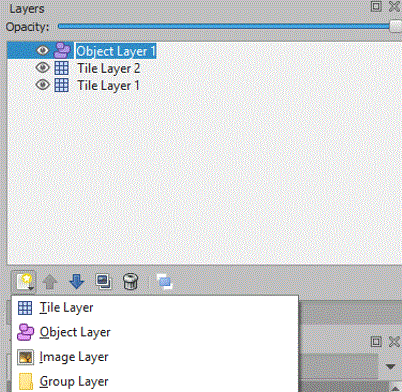
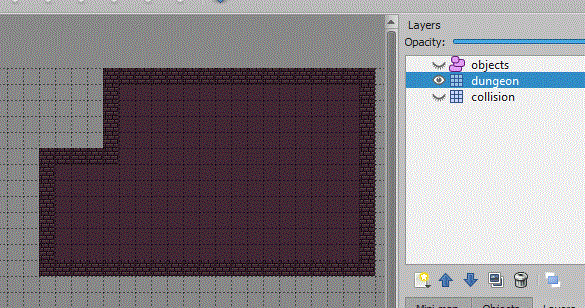
You can click a layer and the rename the layer in the properties panel, i will rename my bottom layer collision, my middle layer dungeon, and my object layer objects. When you are using layers you must always check which layer is currently in use, because it is quite common to add things into the wrong layer.
So with the dungeon layer selected (i have also hidden the other layers) use the tiles to draw a room. I have used the bricks tile to create the walls and then flood filed the floor texture:
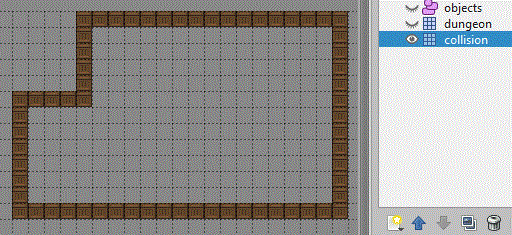
Now unhide the collision layer, and make sure it is selected. Now choose a tile and follow the walls in the dungeon layer:
So if any part of your map needs to be inaccessible by the player, make sure the tiles on the collision layer zone off the area.
We now need to set the player object, this will allow us to load a texture onto the object, and move the object. So select the object layer and then the new rectangle tool:
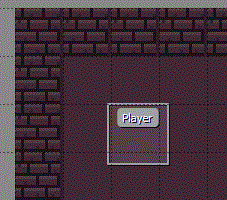
Now click the starting position for your playing character on the map, this will place a rectangle on the screen and in the properties panel you should set the name of the object. You also need to make sure you give it a height and width. I have named mine player:
So now we will save this map, we will add things to this map later.
PyGame Project
Create a new pygame project, you could use THIS template. You will need to copy the TMX map you have created and the tilesheet image into the same folder as the python program.
Install PyTMX
The current version of writing this is 3.21.5, you need to select Tools, Python, Python Environments.
Select Packages and search for PyTMX, this page will show you how to use PyTMX. Other TMX solutions exist and i will overtime have a look to see which are the best.
If you are on your own machine, you can install PyTMX by typing into the command line:
python pip install pytmx
Import PyTMX
We need to import PyTMX, you need to add the following lines to the start of your code:
import pytmx
from pytmx.util_pygame import load_pygame
load_pygame is a method used to load in the map and tileset.
Read in Map
Make sure your map is within the same folder as your code, and that your tileset image is also in the same folder. Obviously make sure you change the name to your tmx file:
tiled_map = load_pygame('SimpleRPG.tmx')
tilewidth = tiled_map.tilewidth
tileheight = tiled_map.tileheight
If you are using tiles with transparent sections, you will need to change the code to load the map to this:
tiled_map = load_pygame('SimpleRPG.tmx', pixelalpha=True)
We will also need to read in the collision layer, this will be used to restrict player movement and shouldn't get drawn:
collision = tiled_map.get_layer_by_name('Collision')
Load in Player image
We will also need to load in an image to use for the player object:
#Player image
player = pygame.image.load(os.path.join("hero.png")).convert_alpha(); # load in coin image, convert_alpha will keep transparent background
player = pygame.transform.scale(player, (20, 30)) # resize player image, this should be the same size as the map object
Draw the Map
Now, within your game loop we need to draw the map. We can do this by cycling through the layers within the map. A for loop is created, and it iterates for each layer. It is important to test if the layer is a Tile layer first. If it is a different layer we will need to draw it differently. Once we have a Tile layer, we can create a for loop to cycle through every tile. If the tile has a value we can then blit it to the screen. The location is calculated using the x & y values:
    for layer in tiled_map.layers:
        if isinstance(layer, pytmx.TiledTileLayer) and (layer!=collision):
            for x, y, tile in layer.tiles():
                if (tile):
                    SCREEN.blit(tile, [x*tilewidth,y*tileheight])

        elif isinstance(layer, pytmx.TiledObjectGroup):
            for object in layer:
                if (object.type=='Player'):
                    SCREEN.blit(player, (object.x, object.y))

        pygame.display.update()
The elif will be accessed if the layer is an object layer. We can then cycle through each object, and if the object has an image we can blit it to the screen at the x & y of the object.
Center Map on Object
You can read an object from your map, this could then be used to center the map to this object. The object has an x & y coordinate and these can be used to essentially set the camera position over your map:
CAMERA = tiled_map.get_object_by_name("Player")
We can now use the object to change the drawing code. If you minus the camera x & y coordinates from the drawing coordinates, you will have your centred position in the top corner. You therefore need to add half of the screen width and height to have it in the centre of the screen. You will also need to change the code to draw each object:
for layer in tiled_map.layers:
        if isinstance(layer, pytmx.TiledTileLayer) and (layer!=collision):
            for x, y, tile in layer.tiles():
                if (tile):
                    SCREEN.blit(tile, [(x*tilewidth) - CAMERA.x +(SCREENWIDTH/2) , (y*tileheight) - CAMERA.y + (SCREENHEIGHT/2)])

        elif isinstance(layer, pytmx.TiledObjectGroup):
            for object in layer:
                if (object.type=='Player'):
                    SCREEN.blit(player, [object.x - CAMERA.x +(SCREENWIDTH/2), object.y - CAMERA.y + (SCREENHEIGHT/2)])
Move Player in Map
In the game loop we need to check which keys are pressed. We can create a structure to store the movement (pos), this is reset every iteration. We can then alter the position of the object by adding pos to the current position:
pos = [0,0]
for events in pygame.event.get(): #get all pygame events
        if events.type == pygame.QUIT: #if event is quit then shutdown window and program
            pygame.quit()
            sys.exit()

PRESSED = pygame.key.get_pressed()

if PRESSED[pygame.K_LEFT]:
        pos[0]-=10
elif PRESSED[pygame.K_RIGHT]:
        pos[0]+=10
if PRESSED[pygame.K_UP]:
        pos[1]-=10
elif PRESSED[pygame.K_DOWN]:
        pos[1]+=10

tiled_map.get_object_by_name("Player").x += pos[0]
tiled_map.get_object_by_name("Player").y += pos[1]
Checking Player Bounds
Earlier you added a line to read the collision layer from the map:
collision = tiled_map.get_layer_by_name('Collision')
Add the following code to extend this, it creates an empty list and the cycles through each tile in the collision layer. If there is a tile it will add it to the tiles list. This will be used to check the player position:
collision = tiled_map.get_layer_by_name('Collision')
tiles = []
for x, y, tile in collision.tiles():
        if (tile):
             tiles.append(pygame.Rect([(x*tilewidth), (y*tileheight), tilewidth, tileheight]));
Now create this method, it accepts the player rectangle and then checks this with the list of tiles:
#tiles is a list of all the tiles in the collision layer
def checkbounds(playerrec):
    check = False
    if (playerrec.collidelistall(tiles)): #this tests every tile with the player rectangle
        check = True
    return check
Finally we need to edit the game loop, so find the following:
PRESSED = pygame.key.get_pressed()

if PRESSED[pygame.K_LEFT]:
        pos[0]-=10
elif PRESSED[pygame.K_RIGHT]:
        pos[0]+=10
if PRESSED[pygame.K_UP]:
        pos[1]-=10
elif PRESSED[pygame.K_DOWN]:
        pos[1]+=10
Add these additional lines, these create a rectangle for where the player will move to, and then passes this into the checkbounds method:
PRESSED = pygame.key.get_pressed()

if PRESSED[pygame.K_LEFT]:
        pos[0]-=10
elif PRESSED[pygame.K_RIGHT]:
        pos[0]+=10
if PRESSED[pygame.K_UP]:
        pos[1]-=10
elif PRESSED[pygame.K_DOWN]:
        pos[1]+=10

#Create rectangle for the player
x = tiled_map.get_object_by_name("Player").x+pos[0]
y = tiled_map.get_object_by_name("Player").y+pos[1]
w = tiled_map.get_object_by_name("Player").width
h = tiled_map.get_object_by_name("Player").height
playerrec = pygame.Rect([x,y,w,h])

            #Check player rectangle with tiles
            #If collision cancel movement
            if(checkbounds(playerrec)):
                pos = [0,0]
If a collision happens we can ignore the movement by resetting pos back to 0,0.
Collectables
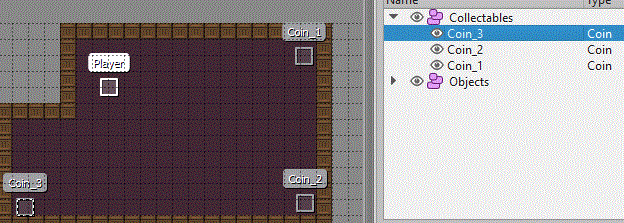
Load your map again in Tiled, this time create a new object layer called Collectables. Then within this layer i have created 3 new objects called Coin_1 , Coin_2 , and Coin_3. I have also set the type to Coin and the height & width of each object to 16 pixels:
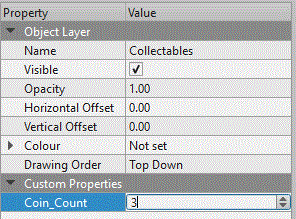
Now, click on the Collectables layer and in the properties panel add a custom property (+ symbol in bottom left corner). Make an integer called Coin_Count:
Read Coin Image
you have already added the code to load in the player image, so under this you could also load in the coin image:
#Coin image
coin = pygame.image.load(os.path.join("Coin.png")).convert_alpha(); # load in coin image, convert_alpha will keep transparent background
coin = pygame.transform.scale(coin, (16, 16)) # resize coin image
Draw Coins
In the code to draw the map, we are drawing player objects:
        elif isinstance(layer, pytmx.TiledObjectGroup):
            for object in layer:#for each object, if it is a coin or player then draw it
                if(object.type=="Player"):
                    SCREEN.blit(player, [object.x - CAMERA.x +(SCREENWIDTH/2), object.y - CAMERA.y + (SCREENHEIGHT/2)])
We need to extend the if statement to also check if the object.type is a Coin:
        elif isinstance(layer, pytmx.TiledObjectGroup):
            for object in layer:#for each object, if it is a coin or player then draw it
                if (object.type=='Coin'):
                    SCREEN.blit(coin, [object.x - CAMERA.x +(SCREENWIDTH/2), object.y - CAMERA.y + (SCREENHEIGHT/2)])
                elif(object.type=="Player"):
                    SCREEN.blit(player, [object.x - CAMERA.x +(SCREENWIDTH/2), object.y - CAMERA.y + (SCREENHEIGHT/2)])
Now coins will be drawn in position on your map.
List of Collectables
You now need to read in each of the objects into a list, this code must go after you read in the map and shouldn't be in the game loop or method:
#Create a list of collectables
objects = tiled_map.get_layer_by_name('Items')
items = []
for object in objects:
    items.append(object)
This code creates an empty list for the items, you read in the object layer into objects. Then you cycle through each object and add it to the list.
Check Coins
Now we have a list of items we can check the position of each one and the player:
def checkcoins(playerrec):
    for item in items:
        coinrec = pygame.Rect([item.x, item.y, item.width, item.height])
        if (coinrec.colliderect(playerrec) and (item.visible!=0)):
            item.visible = 0
this accepts a rectangle for the player, and then for each item it creates a rectangle and then checks for a collision. If a collision has occurred this sets the item.visible to 0. This will stop it from been drawn. Notice we also check that the item.visibile is not equal to 0, this is so we can't collect something invisible.
Adding to Game Loop
Now in the game loop add this to check for collectables:
    #check coins with the current position of the player
    checkcoins(pygame.Rect([tiled_map.get_object_by_name("Player").x,tiled_map.get_object_by_name("Player").y,
                            tiled_map.get_object_by_name("Player").width,tiled_map.get_object_by_name("Player").height]))
The Key
When we collect all of the coins a key or something else should appear, this can be collected to complete a level for example. So add the code below to load in a key image (this can go with the code to load the player & coin images):
#Key image
key = pygame.image.load(os.path.join("key.png")).convert_alpha(); # load in coin image, convert_alpha will keep transparent background
key = pygame.transform.scale(key, (16, 16)) # resize coin image
now we need to draw the key if it is visible, so find the code which draw players and coins. It should be similar to this:
        elif isinstance(layer, pytmx.TiledObjectGroup):
            for object in layer:#for each object, if it is a coin or player then draw it
                if (object.type=='Coin' and object.visible!=0):
                    SCREEN.blit(coin, [object.x - CAMERA.x +(SCREENWIDTH/2), object.y - CAMERA.y + (SCREENHEIGHT/2)])
                elif(object.type=="Player"):
                    SCREEN.blit(player, [object.x - CAMERA.x +(SCREENWIDTH/2), object.y - CAMERA.y + (SCREENHEIGHT/2)])
You need to add another elif for the key, and also remember we need to check if it is visible:
        elif isinstance(layer, pytmx.TiledObjectGroup):
            for object in layer:#for each object, if it is a coin or player then draw it
                if (object.type=='Coin' and object.visible!=0):
                    SCREEN.blit(coin, [object.x - CAMERA.x +(SCREENWIDTH/2), object.y - CAMERA.y + (SCREENHEIGHT/2)])
                elif(object.type=="Player"):
                    SCREEN.blit(player, [object.x - CAMERA.x +(SCREENWIDTH/2), object.y - CAMERA.y + (SCREENHEIGHT/2)])
                elif(object.type=="Key" and object.visible!=0):
                    SCREEN.blit(key, [object.x - CAMERA.x +(SCREENWIDTH/2), object.y - CAMERA.y + (SCREENHEIGHT/2)])
The Door
We also need to draw the door if we don't have the key so read in the door image:
#Door image
door = pygame.image.load(os.path.join("door.png")).convert_alpha(); # load in coin image, convert_alpha will keep transparent background
key = pygame.transform.scale(key, (32, 16)) # resize coin image
now we need to draw the door if it is visible, so find the code which draw players, the key, and coins. It should be similar to this:
        elif isinstance(layer, pytmx.TiledObjectGroup):
            for object in layer:#for each object, if it is a coin or player then draw it
                if (object.type=='Coin' and object.visible!=0):
                    SCREEN.blit(coin, [object.x - CAMERA.x +(SCREENWIDTH/2), object.y - CAMERA.y + (SCREENHEIGHT/2)])
                elif(object.type=="Player"):
                    SCREEN.blit(player, [object.x - CAMERA.x +(SCREENWIDTH/2), object.y - CAMERA.y + (SCREENHEIGHT/2)])
                elif(object.type=="Key" and object.visible!=0):
                    SCREEN.blit(key, [object.x - CAMERA.x +(SCREENWIDTH/2), object.y - CAMERA.y + (SCREENHEIGHT/2)])
You need to add another elif for the door, and also remember we need to check if it is visible:
        elif isinstance(layer, pytmx.TiledObjectGroup):
            for object in layer:#for each object, if it is a coin or player then draw it
                if (object.type=='Coin' and object.visible!=0):
                    SCREEN.blit(coin, [object.x - CAMERA.x +(SCREENWIDTH/2), object.y - CAMERA.y + (SCREENHEIGHT/2)])
                elif(object.type=="Player"):
                    SCREEN.blit(player, [object.x - CAMERA.x +(SCREENWIDTH/2), object.y - CAMERA.y + (SCREENHEIGHT/2)])
                elif(object.type=="Key" and object.visible!=0):
                    SCREEN.blit(key, [object.x - CAMERA.x +(SCREENWIDTH/2), object.y - CAMERA.y + (SCREENHEIGHT/2)])
                elif(object.type=="Door" and object.visible!=0):
                    SCREEN.blit(door, [object.x - CAMERA.x +(SCREENWIDTH/2), object.y - CAMERA.y + (SCREENHEIGHT/2)])
Adding Key & Door to Map
Edit your tiled map by adding a key object into the objects layer, and also place a door object over the tiles in your main layer which represent your door. Remember in your main layer you should have the normal floor tiles and not a wall tile for the tiles under your door object:
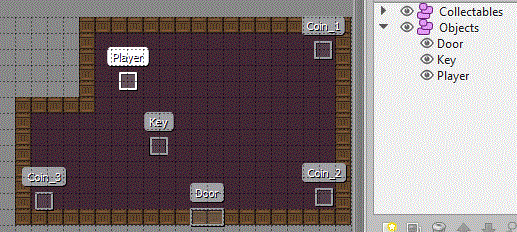
With the door it is important to position the door object over the tiles in the wall, and to ensure you set the type for each object. Remember the key should be invisible to start with.
Check Key code
You could either add code to check the key into the current checkcoins method or just create a separate method. We need to create a list of the objects, this will be for keys and doors. This might seem overkill when there is just one key and one door, however you could expand you map to have many keys and doors. Find the code to create a list of coins and add this code after it:
#Create list of Keys and Doors
objects = tiled_map.get_layer_by_name('Objects')
keyDoor = []
for object in objects:
    keyDoor.append(object)
My key and door objects are in a layer called Objects.
Now for the checkkey method, start by copying the checkcoin method. Change the name and edit it to be:
def checkkey(playerrec):
    for item in keyDoor:
        itemrec = pygame.Rect([item.x, item.y, item.width, item.height])
        if (itemrec.colliderect(playerrec) and (item.visible!=0)):
            item.visible=0
In the game loop find this code:
    #check coins with the current position of the player
    checkcoins(pygame.Rect([tiled_map.get_object_by_name("Player").x,tiled_map.get_object_by_name("Player").y,
                            tiled_map.get_object_by_name("Player").width,tiled_map.get_object_by_name("Player").height]))
copy it and change checkcoins to checkkey:
    #check coins with the current position of the player
    checkcoins(pygame.Rect([tiled_map.get_object_by_name("Player").x,tiled_map.get_object_by_name("Player").y,
                            tiled_map.get_object_by_name("Player").width,tiled_map.get_object_by_name("Player").height]))
    #check key with the current position of the player
    checkkey(pygame.Rect([tiled_map.get_object_by_name("Player").x,tiled_map.get_object_by_name("Player").y,
                            tiled_map.get_object_by_name("Player").width,tiled_map.get_object_by_name("Player").height]))
Extra Logic
At the moment we need to count how many coins have been collected, this will be used to then make the key visible. So declare a new variable, before the game loop, called coincount and set it to be 0:
coincount = 0
Now in he checkcoin method we need to increment the coincount, and check when enough have been collected:
def checkcoins(playerrec):
    for item in items:
        coinrec = pygame.Rect([item.x, item.y, item.width, item.height])
        if (coinrec.colliderect(playerrec) and (item.visible!=0)):
            item.visible=0
            global coincount
            coincount = coincount+1
            if (coincount==3):
                coincount = 0
                print("show key")
                for item in keydoor:
                    if (item.name=="Key"):
                        item.visible = 1;
the code global coincount will allow access to the coincount variable, without this line we couldn't access coincount. The code increments coincount and then check to see if the coincount is equal to 3. If it is, get the key from keyDoor and change the visibility. This will now display the key, and currently when you collect the key it just sets the key to be invisible.
Key Unlocks Door
At the moment the main thing preventing the player from leaving the map are the bounds we have in the collision layer. So we will get the the position of the door, find the tiles it is over and remove them from the collision layer, and finally we need to make the door invisible. Firstly find the checkkey method, it should be something like this:
def checkkey(playerrec):
    for item in keydoor:
        itemrec = pygame.Rect([item.x, item.y, item.width, item.height])
        if (itemrec.colliderect(playerrec) and (item.visible!=0) and (item.type=="Key")):
            item.visible=0
We now need to do more than just hide the key. This creates a rectangle for the door, and then finds all tiles in the collision layer which collide with the rectangle. These tiles are then removed so they won't be used by checkbounds anymore. Finally we need to make the door graphic invisible:
def checkkey(playerrec):
    for item in keydoor:
        itemrec = pygame.Rect([item.x, item.y, item.width, item.height])
        if (itemrec.colliderect(playerrec) and (item.visible!=0) and (item.type=="Key")):
            item.visible=0
            #Code to get the position of the door and create a rectangle
            door = tiled_map.get_object_by_name("Door")
            doorrec = pygame.Rect([door.x,door.y,door.width,door.height])
            tilestodelete = [] #will add tiles to remove to this list
            for tile in tiles:
                #create rectangle for tile, if it collides with player add this tile to the remove list
                tilerec=pygame.Rect([tile.x,tile.y,tile.width,tile.height])
                if(doorrec.colliderect(tilerec)):
                    tilestodelete.append(tile)
            #for loop to remove each tile in the remove list
            for tile in tilestodelete:
                tiles.remove(tile)
            #hide the door because it is now open
            door.visible=0
