Difference between revisions of "Creating the Home page in Django"
(→Using a base template) |
(→Run the server) |
||
| (5 intermediate revisions by the same user not shown) | |||
| Line 1: | Line 1: | ||
=Requirements= | =Requirements= | ||
| − | Before this stage you need to have completed the install, and also | + | Before this stage you need to have completed the install, and also created a project (ie called 'MyProject') and also to created an app (ie called 'MyApp'). |
=Register the App= | =Register the App= | ||
| − | In | + | In your MyApp folder edit the 'apps.py' file, you should see something like this: |
<syntaxhighlight lang=python> | <syntaxhighlight lang=python> | ||
| Line 47: | Line 47: | ||
<syntaxhighlight lang=python> | <syntaxhighlight lang=python> | ||
| − | from MyApp import views as | + | from MyApp import views as myapp_views |
</syntaxhighlight> | </syntaxhighlight> | ||
| Line 53: | Line 53: | ||
<syntaxhighlight lang=python> | <syntaxhighlight lang=python> | ||
| − | path('', | + | path('', myapp_views.home, name='home') |
</syntaxhighlight> | </syntaxhighlight> | ||
| Line 88: | Line 88: | ||
=Run the server= | =Run the server= | ||
| − | + | If you are using PythonAnywhere, you just need to save and click the reload button. | |
| + | |||
| + | If you are using something else, you need to use the management program and choose option 2 for 'Manage' and then option 1 for 'RunServer'. You should see something similar to this: | ||
[[File:Home page running.png]] | [[File:Home page running.png]] | ||
| Line 123: | Line 125: | ||
</div> | </div> | ||
<ul class="nav navbar-nav"> | <ul class="nav navbar-nav"> | ||
| − | <li | + | <li><a href="/">Home</a></li> |
| − | + | <li><a href="#">Page 1</a></li> | |
| − | |||
| − | |||
| − | |||
| − | |||
| − | |||
| − | |||
<li><a href="#">Page 2</a></li> | <li><a href="#">Page 2</a></li> | ||
</ul> | </ul> | ||
Latest revision as of 07:16, 13 July 2023
Contents
Requirements
Before this stage you need to have completed the install, and also created a project (ie called 'MyProject') and also to created an app (ie called 'MyApp').
Register the App
In your MyApp folder edit the 'apps.py' file, you should see something like this:
from django.apps import AppConfig

class MyappConfig(AppConfig):
    name = 'MyApp'
Copy the name of the class, the example above is called MyappConfig. Now goto the 'settings.py' file and find the installed apps definition:
INSTALLED_APPS = [
    'django.contrib.admin',
    'django.contrib.auth',
    'django.contrib.contenttypes',
    'django.contrib.sessions',
    'django.contrib.messages',
    'django.contrib.staticfiles',

]
Add a new entry at the start of this list for your app:
INSTALLED_APPS = [
    'MyApp.apps.MyappConfig',
    'django.contrib.admin',
    'django.contrib.auth',
    'django.contrib.contenttypes',
    'django.contrib.sessions',
    'django.contrib.messages',
    'django.contrib.staticfiles',
]
Define a URL
Now open the 'urls.py' from the project folder, add the following import line:
from MyApp import views as myapp_views
Now find the current 'urlpatterns', We need to add one for the home page of our system. So add:
path('', myapp_views.home, name='home')
Create a View
Now in the 'MyApp' folder edit the file called 'views.py'. We can add the code to generate our pages in here. So add the following:
def home(request):
    return render(request, 'MyApp/home.html',{'title':'Home'})
Create a Template
Now in the 'MyApp' folder we need to create a folder called 'templates' and then inside this folder, we need another folder called 'MyApp'.
Now in this new folder, add a new item (you can right click the folder in solution explorer and choose add, and then new item):
Now select a new html document. Call it 'home.html'
Replace the contents of the html with just:
{% block title %}Home{% endblock %}

{% block content %}
My Home Page
{% endblock %}
Run the server
If you are using PythonAnywhere, you just need to save and click the reload button.
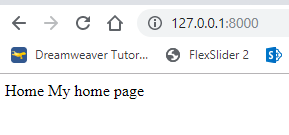
If you are using something else, you need to use the management program and choose option 2 for 'Manage' and then option 1 for 'RunServer'. You should see something similar to this:
Using a base template
In the 'MyApp' folder, 'templates' and finally 'MyApp' add a new item. Choose html and call it 'base.html'.
This will be the template used on every page for navigation and so on. Copy and replace the existing code in 'base.html':
<!DOCTYPE html>
<html lang="en">
<head>
  <title>
     {% if title %}
        MyApp - {{title}}
     {% else %}
        MyApp
     {% endif %}
  </title>
  <meta charset="utf-8">
  <meta name="viewport" content="width=device-width, initial-scale=1">
  <link rel="stylesheet" href="https://maxcdn.bootstrapcdn.com/bootstrap/3.4.0/css/bootstrap.min.css">
  <script src="https://ajax.googleapis.com/ajax/libs/jquery/3.4.0/jquery.min.js"></script>
  <script src="https://maxcdn.bootstrapcdn.com/bootstrap/3.4.0/js/bootstrap.min.js"></script>
</head>
<body>

<nav class="navbar navbar-inverse">
  <div class="container-fluid">
    <div class="navbar-header">
      <a class="navbar-brand" href="#">MyApp</a>
    </div>
    <ul class="nav navbar-nav">
      <li><a href="/">Home</a></li>
      <li><a href="#">Page 1</a></li>
      <li><a href="#">Page 2</a></li>
    </ul>
    <ul class="nav navbar-nav navbar-right">
      <li><a href="#"><span class="glyphicon glyphicon-user"></span> Sign Up</a></li>
      <li><a href="#"><span class="glyphicon glyphicon-log-in"></span> Login</a></li>
    </ul>
  </div>
</nav>

<div class="container">
  {% if messages %}

     {% for message in messages %}

        {{message}}

     {% endfor %}

  {% endif %}

  {% block content %}

  {% endblock content %}
</div>

</body>
</html>
Now we need to make the 'home.html' template use the 'base.html' template. So open your 'home.html' (should be in the 'templates' folder and then 'MyApp'). You need to add the top line below:
{% extends "MyApp/base.html" %}

{% block title %}Home{% endblock %}

{% block content %}
My Home Page
{% endblock %}
It should now look something like:


