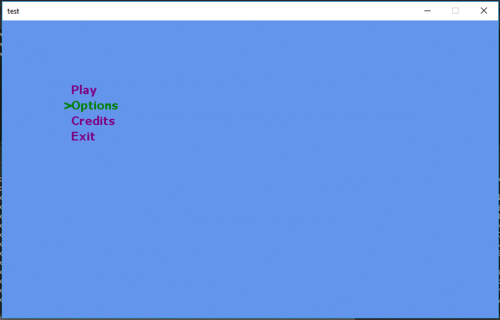
SimpleText UI Example
This UI will allow you to create a text based menu system, you can see an example below:
Setup SimpleText UI
The code is available on GitHub, use the link below to download it from GitHub:
https://github.com/A1rPun/MonoGame.SimpleTextUI
The only file you need is the SimpleTextUI.cs, with your project open, click on project and select a new class. Copy the contents of the SimpleTextUI.cs over the newly created class. If you have several lines underlined in red, you will need to make sure the using section for the new class includes using System;
Adding to your Game1.cs
You will need to add a reference to the new class in the using section of Game1.cs. So add the following:
using A1r.SimpleTextUI;
Now, we need to declare the following variables, add them after SpriteBatch spriteBatch;:
        SimpleTextUI menu;
        SimpleTextUI options;
        SimpleTextUI current;

        SpriteFont big;
        SpriteFont small;

        Timer keytimer;
In the Initialize method we should make the screen fullscreen, we will then toggle this in the options menu. So add the following:
graphics.IsFullScreen = true;
graphics.ApplyChanges();
Now in the LoadContent method we will setup the menus, firstly we need to load in the fonts:
big = Content.Load<SpriteFont>("Big");
small = Content.Load <SpriteFont>("Small");
Now below this we need to define the main menu screen and the options screen:
            // Set menus and screens
            menu = new SimpleTextUI(this, big, new[] { "Play", "Options", "Credits", "Exit" })
            {
                TextColor = Color.Purple,
                SelectedElement = new TextElement(">", Color.Green),
                Align = Alignment.Left
            };

            options = new SimpleTextUI(this, big, new TextElement[]
            {
                new SelectElement("Video", new[]{"FullScreen","Windowed"}),
                new NumericElement("Music",1,3,0f,10f,1f),
                new TextElement("Back")
            });
Finally we need to set the starting screen to the menu, and we will also need a timer to block input for a period of time after an input is accepted:
current = menu;

keytimer = new Timer();
In order to draw the menu we need to add the following into the Draw method of Game1.cs:
current.Draw(gameTime);
Making it work
We need to add some logic code into the update method to actually make the menu system work. This is an example, it firstly gets the keyboard state and the bool change will be used to start the timer when a change is made. This will prevent a key registering more than once. The if statement will ensure that if the timer is running no input will be processed. Finally if a change has been made we start the timer. Copy this code into the Update method of Game1.cs:
            KeyboardState keys = Keyboard.GetState();
            bool change = true;

            if (!keytimer.Enabled)
            {
                if (keys.IsKeyDown(Keys.Up))
                {
                    current.Move(Direction.Up);
                }

                else if (keys.IsKeyDown(Keys.Down))
                {
                    current.Move(Direction.Down);
                }
                else
                    change = false;

                if(change)
                {
                    keytimer = new Timer();
                    keytimer.Interval = 200;
                    keytimer.Elapsed += new ElapsedEventHandler(OnTimedEvent);
                    keytimer.Enabled = true;
                }
            }
We need to create a new method for the OnTimedEvent, we will use this to stop the timer. Copy this code below your update method:
        private void OnTimedEvent(object source, ElapsedEventArgs e)
        {
            keytimer.Enabled = false;
        }
At this point you should be able to move up and down on the first menu, next we need to code the enter button. This will allow us to select an option. Add the following after the else if for the key down and before the else:
                else if (keys.IsKeyDown(Keys.Down))
                {
                    current.Move(Direction.Down);
                }

                else if (keys.IsKeyDown(Keys.Enter))
                {
                    string test = current.GetCurrentCaption();

                    if (current == menu)
                    {
                        if (test == "Exit")
                            Exit();
                        else if (test == "Options")
                        {
                            current = options;
                        }
                    }

                    else if (current == options)
                    {
                        if (test == "Back")
                        {
                            current = menu;
                        }
                    }
                }
                else
                    change = false;
When the enter key is pressed we get the current caption, this should be the selected menu option. So we need to check which is the current screen, and then if it is the menu we need to check for exit and options. Exit will quit the program and Options will set the current screen to options. If we are on the options screen we only need to check for the back option. If this is selected we need to set the current screen to the menu.
At this point you should be able to move up and down on the menus, and you should be able to select exit, options and back. Now to change the Video option we need to code the left and right keys.
Add the following into the nested if statement, it can go as an else if after the up, down, or enter sections:
                else if (keys.IsKeyDown(Keys.Left))
                {
                    current.Move(Direction.Left);
                    if (current.GetCurrentCaption() == "Video")
                    {
                        graphics.IsFullScreen = (current.GetCurrentValue() == "FullScreen");
                        graphics.ApplyChanges();
                    }
                }

                else if (keys.IsKeyDown(Keys.Right))
                {
                    current.Move(Direction.Right);
                    if (current.GetCurrentCaption() == "Video")
                    {
                        graphics.IsFullScreen = (current.GetCurrentValue() == "FullScreen");
                        graphics.ApplyChanges();
                    }
                }
Pressing left and right will change the current option. So the code above will first get the current caption (menu option selected), if it is video we will get the current selected value and use it to set it to fullscreen. ApplyChanges() must be called if the graphics options are changed.
Adding a Shadow
In the code downloaded from GitHub, find the line "public class TextElement". This is the class definition for a TextElement, in this some variables are already declared but add the following also:
        public Color ShadowColor = Color.Black;
        public bool Shadow = true;
        public Vector2 ShadowOffset = new Vector2(1, 1);
Now still within the TextElement class, change the Draw method to this:
        public virtual void Draw(SpriteBatch batch, SpriteFont font, Color? color = null)
        {
            if(Shadow)
                batch.DrawString(font, Caption, Position+ShadowOffset, ShadowColor);

            batch.DrawString(font, Caption, Position, color ?? Color);
        }
Finally, these variables will be inherited by the MultiTextElement. Find the MultiTextElement class, look for "public class MultiTextElement:TextElement". Within this class change the Draw method to this:
        public override void Draw(SpriteBatch batch, SpriteFont font, Color? color = null)
        {
            if(Shadow)
                batch.DrawString(font, Caption, Position+ShadowOffset, ShadowColor);

            batch.DrawString(font, Caption, Position, color ?? Color);

            if(Shadow)
                batch.DrawString(font, Text, TextPosition+ShadowOffset, ShadowColor);

            batch.DrawString(font, Text, TextPosition, color ?? Color);
        }
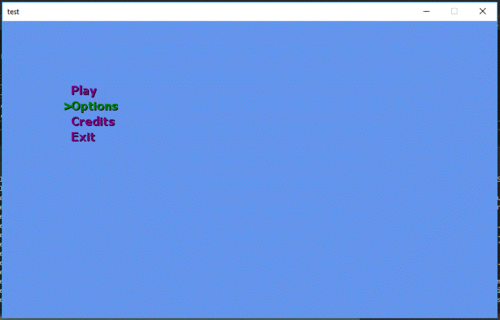
Your menus will now have a shadow:

