Simple RPG
This tutorial will create a Tiled map based RPG game, which uses a collision layer within your map to control where the player can go. It will also show you how to create an objects layer for the player, and also collectables.
Contents
Creating the Map
Tiled
You will firstly need to install the Tiled program from the website and link below. In college the Tiled executeables are on moodle, under project, technical skill, monogame, and tiled. I have also added links to other tutorials for using Tiled.
Tiled Website and Download
Tutorials for using Tiled
Written Version of Above Tutorials
Create a Map in Tiled
Map Settings
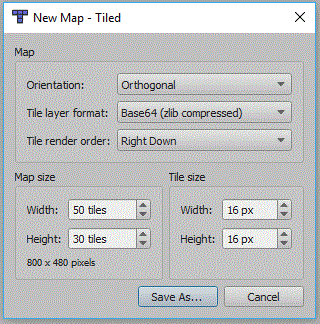
You will need to create a new map in tiled, the settings window below should be displayed:
The Tile size will need to match the tile size of your tileset. You can also specify the number of tiles in your your map, this and the tile size will create a map of a given size in pixels. You should be able to leave everything else the same.
You should now have an empty map, later on we will use Square.Tiled to draw the map this only supports maps in the Base64 GZIP format. So in the properties panel set the Tile Layer Format to Base64 (gzip compressed):
File:Tiled compression setting.gif
Tileset
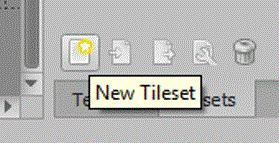
Now to import the tileset, i'm using one of the 16x16 dungeon tileset on the project page of the computer science moodle page. If you are using a different tileset you may need to set a different tile height and width. To import a tileset you need to click the New Tileset icon in the bottom right corner:
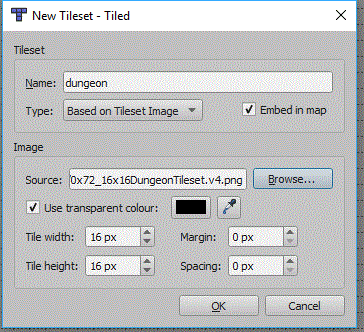
Now the new tileset panel will appear:
Your tileset can be individual images, it is more usual for them to be on a single tileset image. You must click the embed in map option, Square.Tiled doesn't support external tilesets (TSX files). Some tileset images might also use a margin or spacing between each tile, this screen will allow you to set these if needed.
Map Layers
Your map should already have a layer called Map Layer 1, use the new layer button to also add another tile layer and then an object layer:
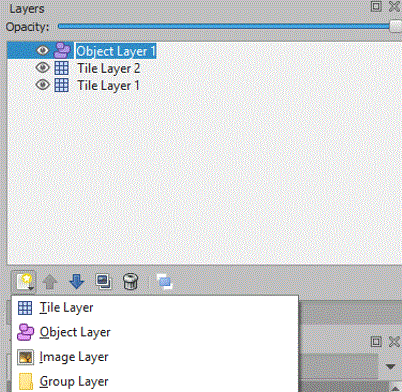
You can click a layer and the rename the layer in the properties panel, i will rename my bottom layer collision, my middle layer dungeon, and my object layer objects. When you are using layers you must always check which layer is currently in use, because it is quite common to add things into the wrong layer.
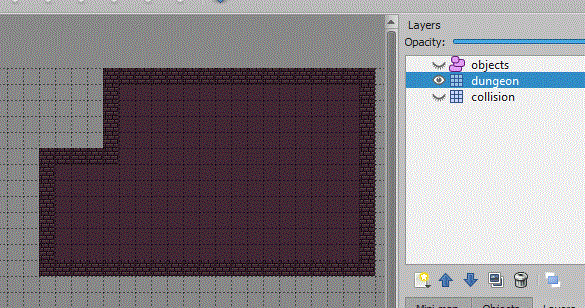
So with the dungeon layer selected (i have also hidden the other layers) use the tiles to draw a room. I have used the bricks tile to create the walls and then flood filed the floor texture:
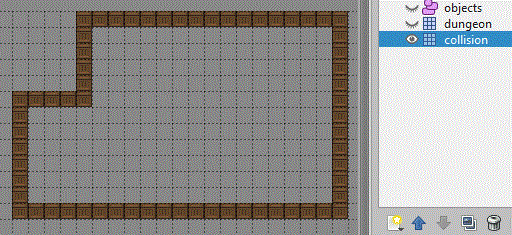
Now unhide the collision layer, and make sure it is selected. Now choose a tile and follow the walls in the dungeon layer:
So if any part of your map needs to be inaccessible by the player, make sure the tiles on the collision layer zone off the area.
We now need to set the player object, this will allow us to load a texture onto the object, and move the object. So select the object layer and then the new rectangle tool:
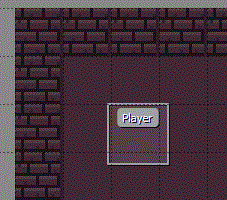
Now click the starting position for your playing character on the map, this will place a rectangle on the screen and in the properties panel you should set the name of the object. You also need to make sure you give it a height and width. I have named mine player:
So now we will save this map, we will add things to this map later.
MonoGame Project
Create a new MonoGame project, mine is a Windows project.
Setup Square.Tiled
If you have a project ready, create a new class in your project. Click project and new class and call it Tiled.cs, then copy the code from this document over the code in your new class: Square.Tiled Class
Remember to set the name space to Squared.Tiled.
You will need to add references in the using section for the following:
using System.IO;
using Squared.Tiled;
While you add those you may as also add the following for the use of List later:
using System.Collections.Generic;
Code to Display Map
Map Variables
At the top of your Game1 class add these additional variables:
Map map;
Layer collision;
Vector2 viewportPosition;
int tilepixel;
LoadContent for map
In the LoadContent method add the following lines to load the map, the collision layer and to set the texture of the player. The variable tilepixel assumes your tiles are square, the number of pixels is taken from the map:
map = Map.Load(Path.Combine(Content.RootDirectory, "SimpleRPG.tmx"), Content);
collision = map.Layers["Collision"];
tilepixel = map.TileWidth;
map.ObjectGroups["objects"].Objects["Player"].Texture = Content.Load<Texture2D>("hero");
The Update Method
You will also need to update the viewportPosition, this will center the map onto the player:
viewportPosition= new Vector2(map.ObjectGroups["objects"].Objects["Player"].X - (graphics.PreferredBackBufferWidth/2), map.ObjectGroups["objects"].Objects["Player"].Y - (graphics.PreferredBackBufferHeight/2));
The Draw Method
Add the following to the draw method to draw the map and hero to the screen.
If you already have spriteBatch.Begin() or spriteBatch.End() then just place the middle line inbetween your lines.
spriteBatch.Begin();
map.Draw(spriteBatch, new Rectangle(0, 0, GraphicsDevice.Viewport.Width, GraphicsDevice.Viewport.Height), viewportPosition);
spriteBatch.End();
At this point your project should run an display your map centered onto the player.
Move Player
Create a new method in Game1.cs to process any input into movement on the screen. My method is called ProcessMovement and you will need to pass it parameters for the KeyboardState and the GamePadState:
        public void ProcessMovement(KeyboardState keyState, GamePadState gamePadState)
        {

        }
We need to create a couple of variables to store the movement required, one is for the X scroll value and the other is for the Y scroll value:
        public void ProcessMovement(KeyboardState keyState, GamePadState gamePadState)
        {
            //detect key press and xy scroll values
            int scrollx = 0, scrolly = 0, moveSpeed = 2;

        }
Now for processing the keyboard input:
        public void ProcessMovement(KeyboardState keyState, GamePadState gamePadState)
        {
            //detect key press and xy scroll values
            int scrollx = 0, scrolly = 0, moveSpeed = 2;
            if (keyState.IsKeyDown(Keys.Left))
                scrollx = -1;
            if (keyState.IsKeyDown(Keys.Right))
                scrollx = 1;
            if (keyState.IsKeyDown(Keys.Up))
                scrolly = 1;
            if (keyState.IsKeyDown(Keys.Down))
                scrolly = -1;

        }
Now for the gamepad input, casting or conversion is required because gamePadState.ThumbSticks.Left.X gives a float and not an integer:
        public void ProcessMovement(KeyboardState keyState, GamePadState gamePadState)
        {
            //detect key press and xy scroll values
            int scrollx = 0, scrolly = 0, moveSpeed = 2;
            if (keyState.IsKeyDown(Keys.Left))
                scrollx = -1;
            if (keyState.IsKeyDown(Keys.Right))
                scrollx = 1;
            if (keyState.IsKeyDown(Keys.Up))
                scrolly = 1;
            if (keyState.IsKeyDown(Keys.Down))
                scrolly = -1;

            scrollx += (int)gamePadState.ThumbSticks.Left.X;
            scrolly += (int)gamePadState.ThumbSticks.Left.Y;
        }
Now to use the scrollx & scrolly values to move the player in the map:
        public void ProcessMovement(KeyboardState keyState, GamePadState gamePadState)
        {
            //detect key press and xy scroll values
            int scrollx = 0, scrolly = 0, moveSpeed = 2;
            if (keyState.IsKeyDown(Keys.Left))
                scrollx = -1;
            if (keyState.IsKeyDown(Keys.Right))
                scrollx = 1;
            if (keyState.IsKeyDown(Keys.Up))
                scrolly = 1;
            if (keyState.IsKeyDown(Keys.Down))
                scrolly = -1;

            scrollx += (int)gamePadState.ThumbSticks.Left.X;
            scrolly += (int)gamePadState.ThumbSticks.Left.Y;

            map.ObjectGroups["objects"].Objects["Player"].X += (scrollx * moveSpeed);
            map.ObjectGroups["objects"].Objects["Player"].Y -= (scrolly * moveSpeed);
        }
Now we need to add a few lines to call our method in the Update method. The gamePadState & keyboardState variables will have the player input, we pass this into the ProcessMovement method:
            GamePadState gamePadState = GamePad.GetState(PlayerIndex.One);
            KeyboardState keyState = Keyboard.GetState();
            processMovement(keyState, gamePadState);
At this point the player should move around the map, but we haven't done anything to confine the player to the room.
Player Bounds
Create a new method in your Game1.cs called CheckBounds, we will need this method to return a boolean to identify if the player is within the bounds or not:
public bool CheckBounds()
{
            bool check = false;
            return check;
}
Now we need to identify the 4 corners of our player, we need to know the exact coordinates for each. The left top corner is easy because the X & Y of the player will give you this corner. The right top can be calculated by adding the Width onto the X of the player, the Y should be the same. The left bottom can be calculated by adding the height to the Y coordinate of the player. The right bottom can be calculated by adding the width to the X and the height to the Y:
public bool CheckBounds()
{
            bool check = false;
            //get exact coordinates for each corner
            Vector2 lt = new Vector2(map.ObjectGroups["objects"].Objects["Player"].X, map.ObjectGroups["objects"].Objects["Player"].Y);
            Vector2 rt = lt + new Vector2(map.ObjectGroups["objects"].Objects["Player"].Width, 0);
            Vector2 lb = lt + new Vector2(0, map.ObjectGroups["objects"].Objects["Player"].Height);
            Vector2 rb = lt + new Vector2(map.ObjectGroups["objects"].Objects["Player"].Width,
                map.ObjectGroups["objects"].Objects["Player"].Height);

            return check;
}
Now we know the location of each corner we can check to see which tile the corner is over. This can be calculated by dividing the X & Y coordinates by the tilepixel variable. We can add these new vectors into a list:
public bool CheckBounds()
{
            bool check = false;
            //get exact coordinates for each corner
            Vector2 lt = new Vector2(map.ObjectGroups["objects"].Objects["Player"].X, map.ObjectGroups["objects"].Objects["Player"].Y);
            Vector2 rt = lt + new Vector2(map.ObjectGroups["objects"].Objects["Player"].Width, 0);
            Vector2 lb = lt + new Vector2(0, map.ObjectGroups["objects"].Objects["Player"].Height);
            Vector2 rb = lt + new Vector2(map.ObjectGroups["objects"].Objects["Player"].Width,
                map.ObjectGroups["objects"].Objects["Player"].Height);

            //get the tile row and column for each corner
            List<Vector2> corners = new List<Vector2>();
            corners.Add(new Vector2((lt.X / tilepixel), (lt.Y / tilepixel)));
            corners.Add(new Vector2((lb.X / tilepixel), (lb.Y / tilepixel)));
            corners.Add(new Vector2((rt.X / tilepixel), (rt.Y / tilepixel)));
            corners.Add(new Vector2((rb.X / tilepixel), (rb.Y / tilepixel)));

            return check;
}
Now we know the tile position for each corner we can check if that tile in our collision layer tile is empty (0) or not. If the tile has a different value then we have collided with the bounds of the room:
public bool CheckBounds()
{
            bool check = false;
            //get exact coordinates for each corner
            Vector2 lt = new Vector2(map.ObjectGroups["objects"].Objects["Player"].X, map.ObjectGroups["objects"].Objects["Player"].Y);
            Vector2 rt = lt + new Vector2(map.ObjectGroups["objects"].Objects["Player"].Width, 0);
            Vector2 lb = lt + new Vector2(0, map.ObjectGroups["objects"].Objects["Player"].Height);
            Vector2 rb = lt + new Vector2(map.ObjectGroups["objects"].Objects["Player"].Width,
                map.ObjectGroups["objects"].Objects["Player"].Height);

            //get the tile row and column for each corner
            List<Vector2> corners = new List<Vector2>();
            corners.Add(new Vector2((lt.X / tilepixel), (lt.Y / tilepixel)));
            corners.Add(new Vector2((lb.X / tilepixel), (lb.Y / tilepixel)));
            corners.Add(new Vector2((rt.X / tilepixel), (rt.Y / tilepixel)));
            corners.Add(new Vector2((rb.X / tilepixel), (rb.Y / tilepixel)));

            //check if any corners are on a blocked tile
            foreach (Vector2 corner in corners)
            {
                int tile = collision.GetTile((int)corner.X, (int)corner.Y);
                if (tile != 0)
                {
                    check = true;
                }
            }

            return check;
}
Using CheckBounds
Now we need to edit the Update method of Game1.cs, firstly we want to record the current X & Y value of the player before we apply any movement. We can then use ProcessMovent to move the player, and then CheckBounds. If CheckBounds returns true we can use the stored X & Y values to move the player back to the position before the movement:
            //store current position to move back too if collision
            int tempx = map.ObjectGroups["objects"].Objects["Player"].X;
            int tempy = map.ObjectGroups["objects"].Objects["Player"].Y;

            processMovement(keyState, gamePadState);

            //now we have moved checkbounds
            if (CheckBounds())
            {
                map.ObjectGroups["objects"].Objects["Player"].X = tempx;
                map.ObjectGroups["objects"].Objects["Player"].Y = tempy;
            }
You should now have a player confined to the room you created on your map.
Other CheckBounds ideas
Find the center tile and then check the tile to the left & right, and above & below:
public bool CheckBounds()
        {
            bool check = false;

            Vector2 centertile = new Vector2(
                (map.ObjectGroups["Objects"].Objects["Player"].X + (map.ObjectGroups["Objects"].Objects["Player"].Width / 2))/tilepixel,
                (map.ObjectGroups["Objects"].Objects["Player"].Y + (map.ObjectGroups["Objects"].Objects["Player"].Height / 2))/tilepixel
                );

            if (collision.GetTile((int)centertile.X - 1, (int)centertile.Y) != 0)
                check = true;
            if (collision.GetTile((int)centertile.X + 1, (int)centertile.Y) != 0)
                check = true;
            if (collision.GetTile((int)centertile.X, (int)centertile.Y-1) != 0)
                check = true;
            if (collision.GetTile((int)centertile.X, (int)centertile.Y+1) != 0)
                check = true;

            //Console.WriteLine(check);
            return check;
        }
The method above doesn't allow you to get very close to the actual bounds. Instead we can also create a rectangle for the player and the tile to see if they intersect:
public bool CheckBounds()
        {
            bool check = false;

            Rectangle playrec = new Rectangle(
                map.ObjectGroups["Objects"].Objects["Player"].X,
                map.ObjectGroups["Objects"].Objects["Player"].Y,
                map.ObjectGroups["Objects"].Objects["Player"].Width,
                map.ObjectGroups["Objects"].Objects["Player"].Height
                );

            Vector2 centertile = new Vector2(
                (map.ObjectGroups["Objects"].Objects["Player"].X + (map.ObjectGroups["Objects"].Objects["Player"].Width / 2)) / tilepixel,
                (map.ObjectGroups["Objects"].Objects["Player"].Y + (map.ObjectGroups["Objects"].Objects["Player"].Height / 2)) / tilepixel
                );

            if (collision.GetTile((int)centertile.X + 1, (int)centertile.Y)!=0)
            {
                Rectangle right = new Rectangle(
                    (int)(centertile.X + 1) * tilepixel,
                    (int)centertile.Y * tilepixel,
                    tilepixel,
                    tilepixel
                    );

                if (playrec.Intersects(right))
                    check = true;
            }

            if (collision.GetTile((int)centertile.X - 1, (int)centertile.Y) != 0)
            {
                Rectangle left = new Rectangle(
                    (int)(centertile.X - 1) * tilepixel,
                    (int)centertile.Y * tilepixel,
                    tilepixel,
                    tilepixel
                    );

                if (playrec.Intersects(left))
                    check = true;
            }

            if (collision.GetTile((int)centertile.X, (int)centertile.Y-1) != 0)
            {
                Rectangle top= new Rectangle(
                    (int)centertile.X * tilepixel,
                    (int)(centertile.Y-1) * tilepixel,
                    tilepixel,
                    tilepixel
                    );

                if (playrec.Intersects(top))
                    check = true;
            }

            if (collision.GetTile((int)centertile.X, (int)centertile.Y+1) != 0)
            {
                Rectangle bottom = new Rectangle(
                    (int)centertile.X * tilepixel,
                    (int)(centertile.Y+1) * tilepixel,
                    tilepixel,
                    tilepixel
                    );

                if (playrec.Intersects(bottom))
                    check = true;
            }


            return check;
        }
You could also check each of the tiles around the centertile using two for loops. The code, if (x != 0 && y != 0) is to not check the center tile because this will obviously collide with the player :
public bool CheckBounds()
        {
            bool check = false;

            Rectangle playrec = new Rectangle(
                map.ObjectGroups["Objects"].Objects["Player"].X,
                map.ObjectGroups["Objects"].Objects["Player"].Y,
                map.ObjectGroups["Objects"].Objects["Player"].Width,
                map.ObjectGroups["Objects"].Objects["Player"].Height
                );

            Vector2 centertile = new Vector2(
                (map.ObjectGroups["Objects"].Objects["Player"].X + (map.ObjectGroups["Objects"].Objects["Player"].Width / 2))/tilepixel,
                (map.ObjectGroups["Objects"].Objects["Player"].Y + (map.ObjectGroups["Objects"].Objects["Player"].Height / 2))/tilepixel
                );

            for (int x=-1; x<=1; x++)
            {
                for (int y = -1; y <=1; y++)
                {
                    Vector2 tempv = centertile + new Vector2(x, y);
                    if (x != 0 && y != 0)
                    {
                        if (collision.GetTile((int)tempv.X, (int)tempv.Y) != 0)
                        {
                            Rectangle temp = new Rectangle(
                                (int)tempv.X * tilepixel,
                                (int)tempv.Y * tilepixel,
                                tilepixel,
                                tilepixel
                                );

                            if (playrec.Intersects(temp))
                                check = true;
                        }
                    }
                }

                return check;
        }
Collectables
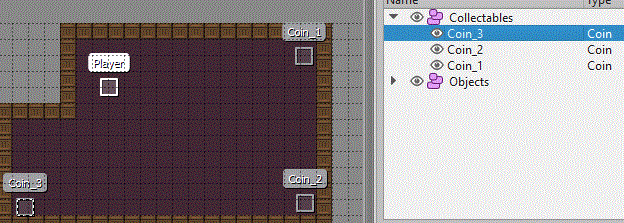
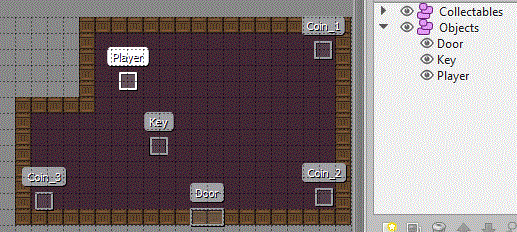
Load your map again in Tiled, this time create a new object layer called Collectables. Then within this layer i have created 3 new objects called Coin_1 , Coin_2 , and Coin_3. I have also set the type to Coin and the height & width of each object to 16 pixels:
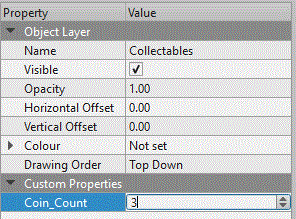
Now, click on the Collectables layer and in the properties panel add a custom property (+ symbol in bottom left corner). Make an integer called Coin_Count:
Texture2D Declarations
We need to declare two Texture2D variables in the declaration section of Game1.cs:
Texture2D coinTexture, blankTexture;
LoadContent
Now we can add the code to load the texture and to apply the texture to each object. We use the Coin_Count custom property to loop through each coin. The naming for the coins use the prefix "Coin_" followed by a number, so we can create the names within the loop:
            coinTexture = Content.Load<Texture2D>("Coin");
            blankTexture = Content.Load<Texture2D>("Transparent");

            int coinCount = Convert.ToInt32(map.ObjectGroups["Collectables"].Properties["Coin_Count"]);
            for (int i = 1; i <= coinCount; i++)
            {
                map.ObjectGroups["Collectables"].Objects["Coin_"+i].Texture = coinTexture;
            }
A blank texture is required so that it can be used to remove the coin texture once it has been collected. You can use this image for your blank texture:
![]() <--- it is here, remember its transparent.
<--- it is here, remember its transparent.
Now your collectables should be visible when you run your project.
Checking Collectables
Create a new method called CheckCoins, this method will need to accept a rectangle to represent the bounds of the player:
        public void CheckCoins(Rectangle player)
        {

        }
we need to get the number of coins from the Coin_Count property in the map. We can then use this in a for loop. The loop gets the coin from the map, and then creates a rectangle to represent its bounds:
        public void CheckCoins(Rectangle player)
        {
            int coinCount = Convert.ToInt32(map.ObjectGroups["Collectables"].Properties["Coin_Count"]);
            for (int i = 1; i <= coinCount; i++)
            {
                var coin = map.ObjectGroups["Collectables"].Objects["Coin_" + i];
                Rectangle coinRec = new Rectangle(coin.X, coin.Y, coin.Width, coin.Height);

            }
        }
Now we have the two rectangles required to check for a collision between the player & the coin. If a collision occurs the code writes the output to the console and sets the texture of the coin to the blank texture.
        public void CheckCoins(Rectangle player)
        {
            int coinCount = Convert.ToInt32(map.ObjectGroups["Collectables"].Properties["Coin_Count"]);
            for (int i = 1; i <= coinCount; i++)
            {
                var coin = map.ObjectGroups["Collectables"].Objects["Coin_" + i];

                Rectangle coinRec = new Rectangle(coin.X, coin.Y, coin.Width, coin.Height);
                if (player.Intersects(coinRec))
                {
                    Console.WriteLine("collision - " + i);
                    coin.Texture = blankTexure;
                }
            }
        }
Now add the code to run CheckCoins in the Update method of Game1.cs, This gets the player, creates a rectangle for the player, and then pass this rectangle to CheckCoins:
            var p = map.ObjectGroups["Objects"].Objects["Player"];
            Rectangle playerRec = new Rectangle(p.X, p.Y, p.Width, p.Height);
            CheckCoins(playerRec);
You should now be able to collide with the coins, and they will then dissappear.
CheckCoin Improvements
The CheckCoin method should ignore coins with a texture set to the blankTexture so:
        public void CheckCoins(Rectangle player)
        {
            int coinCount = Convert.ToInt32(map.ObjectGroups["Collectables"].Properties["Coin_Count"]);
            for (int i = 1; i <= coinCount; i++)
            {
                var coin = map.ObjectGroups["Collectables"].Objects["Coin_" + i];
                if (coin.Texture != blankTexture)
                {
                    Rectangle coinRec = new Rectangle(coin.X, coin.Y, coin.Width, coin.Height);
                    if (player.Intersects(coinRec))
                    {
                        Console.WriteLine("collision - " + i);
                        coin.Texture = blankTexture;
                    }
                }
            }
        }
Key & Door
Edit your tiled map by adding a key object into the objects layer, and also place a door object over the tiles in your main layer which represent your door:
With the door it is important to position the door object over the tiles in the wall.
We will need to add another Texture2D to the declaration section, so:
Texture2D blankTexture, coinTexture;
becomes:
Texture2D blankTexture, coinTexture, keyTexture;
In the LoadContent method we will need to load in the keyTexture:
keyTexture = Content.Load<Texture2D>("Key");
Now in the CheckCoins method, we will change the code so that collecting the coins will give you the key. We need to create a new integer to count the number of keys collected. We can do this by adding the else onto the existing if statement in CheckCoins:
        public void CheckCoins(Rectangle player)
        {
            int coinCount = Convert.ToInt32(map.ObjectGroups["Collectables"].Properties["Coin_Count"]);
            int collectCount = 0;

            for (int i = 1; i <= coinCount; i++)
            {
                var coin = map.ObjectGroups["Collectables"].Objects["Coin_" + i];
                if (coin.Texture != blankTexture)
                {
                    Rectangle coinRec = new Rectangle(coin.X, coin.Y, coin.Width, coin.Height);
                    if (player.Intersects(coinRec))
                    {
                        Console.WriteLine("collision - " + i);
                        coin.Texture = blankTexture;
                    }
                }
                else
                {
                    collectCount++;
                }
            }
        }
Finally if the coins have been collected we can display the key:
        public void CheckCoins(Rectangle player)
        {
            int coinCount = Convert.ToInt32(map.ObjectGroups["Collectables"].Properties["Coin_Count"]);
            int collectCount = 0;

            for (int i = 1; i <= coinCount; i++)
            {
                var coin = map.ObjectGroups["Collectables"].Objects["Coin_" + i];
                if (coin.Texture != blankTexture)
                {
                    Rectangle coinRec = new Rectangle(coin.X, coin.Y, coin.Width, coin.Height);
                    if (player.Intersects(coinRec))
                    {
                        Console.WriteLine("collision - " + i);
                        coin.Texture = blankTexture;
                    }
                }
                else
                {
                    collectCount++;
                }
            }
            var key = map.ObjectGroups["Objects"].Objects["Key"].Texture;
            if (collectCount == coinCount &&  key !=blankTexture)
                map.ObjectGroups["Objects"].Objects["Key"].Texture = keyTexture;
        }
Check Collision for Key
We need to create a method called CheckKey, this should accept a rectangle to represent the player bounds. This method gets the key object from the map and checks if the texture applied is the keyTexture (this will mean it has been drawn to the screen, other wise it will be empty or the blankTexture). The method creates a rectangle to represent the bounds of the key and then finally checks if the player intersects this rectangle:
public void CheckKey(Rectangle player)
        {
            var key = map.ObjectGroups["Objects"].Objects["Key"];
            if (key.Texture == keyTexture)
            {
                Rectangle keyRec = new Rectangle(key.X, key.Y, key.Width, key.Height);
                if (player.Intersects(keyRec))
                {

                }
            }
Now we have detected the collision we need to program what to do. Firstly set the key texture to the blankTexture, then get the door object from the map. We need to work out which tiles we need to change, we can do this by dividing the X & Y of the door by the tilepixel variable we have used before. The tiles are stored in a one dimensional array, so we need to work out from our tile coordinates which element our tile is in. You do this by multiplying the Y coordinate by the width and then add the X coordinate. We can then set this tile on the collision layer to 0 and on the dungeon layer to 51 (tileset id for the floor tile i used)
public void CheckKey(Rectangle player)
        {
            var key = map.ObjectGroups["Objects"].Objects["Key"];
            if (key.Texture == keyTexture)
            {
                Rectangle keyRec = new Rectangle(key.X, key.Y, key.Width, key.Height);
                if (player.Intersects(keyRec))
                {
                    key.Texture = blankTexture;
                    var door = map.ObjectGroups["Objects"].Objects["Door"];

                    int tilex = door.X / tilepixel;
                    int tiley = door.Y / tilepixel;
                    int tile = (tiley) * 50 + tilex;
                    collision.Tiles[tile] = 0;
                    map.Layers["dungeon"].Tiles[tile] = 51;
                }
            }
We should now have the first door tile cleared however, if the door is horizontal we need to remove the next tile and if the door is vertical we need to remove the tile below as well:
public void CheckKey(Rectangle player)
        {
            var key = map.ObjectGroups["Objects"].Objects["Key"];
            if (key.Texture == keyTexture)
            {
                Rectangle keyRec = new Rectangle(key.X, key.Y, key.Width, key.Height);
                if (player.Intersects(keyRec))
                {
                    key.Texture = blankTexture;
                    var door = map.ObjectGroups["Objects"].Objects["Door"];

                    int tilex = door.X / tilepixel;
                    int tiley = door.Y / tilepixel;
                    int tile = (tiley) * 50 + tilex;
                    collision.Tiles[tile] = 0;
                    map.Layers["dungeon"].Tiles[tile] = 51;

                    if (door.Height>door.Width)
                    {
                        tilex = door.X / tilepixel;
                        tiley = (door.Y + tilepixel) / tilepixel;
                    }
                    else
                    {
                        tilex =( door.X + tilepixel) / tilepixel;
                        tiley = door.Y / tilepixel;
                    }

                    tile = (tiley) * 50 + tilex;

                    collision.Tiles[tile] = 0;
                    map.Layers["dungeon"].Tiles[tile] = 51;
                }
            }
Finally we need to add CheckKey to the update method, i have added the code below after the CheckCoin(playerRec) line:
CheckKey(playerRec);
