Animation
This will show you how to animate a character. The idea is to use a texture which is actually a strip of frames, then knowing the width and height of each frame should allow you to only display the part of the texture which represents the current frame.
Contents
[hide]Changing the Player Class
Firstly, change the name of the Texture2D to something more appropriate eg PlayerAnimation:
public Texture2D PlayerAnimation;
We now need to add the following variables to the player to control the frame displayed:
// Get the width of the player ship
// The time since we last updated the frame
int elapsedTime;

// The number of frames that the animation contains
int frameCount;

// The index of the current frame we are displaying
int currentFrame;

// The color of the frame we will be displaying
Color color;

// The area of the image strip we want to display
Rectangle sourceRect = new Rectangle();

// The area where we want to display the image strip in the game
Rectangle destinationRect = new Rectangle();

// Width of a given frame
public int FrameWidth;

// Height of a given frame
public int FrameHeight;
Change the Initialize method
public void Initialize(Texture2D animation, Vector2 position)
{
	PlayerAnimation = animation;

	// Set the starting position of the player around the middle of the screen and to the back
	Position = position;

	// Set the player to be active
	Active = true;

	// Set the player health
	Health = 100;

	this.color = Color.White;
	this.FrameWidth = 115;
	this.FrameHeight = 69;
	this.frameCount = 8;

	// Set the time to zero
	elapsedTime = 0;
	currentFrame = 0;
}
The Initialize method needs to configure the frame information. The sprite strip will have 8 frames, each one 115 pixels by 69 pixels. The elapsed time is to time the change from frame to frame, the current frame will record the frame to be displayed. The other main change is the PlayerAnimation, updating the variable names to match the changes in the previous section.
The Draw Method
You will need to alter the Draw method, this will draw the PlayerAnimation at the location specified in the destinationRect. But it will only draw the section of the playerAnimation specified in the sourceRect:
public void Draw(SpriteBatch spriteBatch)
{
	spriteBatch.Draw(PlayerAnimation, destinationRect, sourceRect, color);
}
The Update Method - AKA the business
Firstly make sure the Update method has the following passed into the method:
public void Update(GameTime gameTime)
Now we need to time the duration between switching the frame. Firstly we need to set the time elapsed since the last change of frame. If the elapsed time is greater than 100 milliseconds then increment the current frame by 1. FrameCount is used to check if we need to reset the current frame to zero. Finally we reset the elapsed time in order to time the next change of frame.
elapsedTime += (int)gameTime.ElapsedGameTime.TotalMilliseconds;

// If the elapsed time is larger than the frame time
// we need to switch frames
if (elapsedTime > 100)
{
	// Move to the next frame
	currentFrame++;

	// If the currentFrame is equal to frameCount reset currentFrame to zero
	if (currentFrame == frameCount)
	{
		currentFrame = 0;
	}

	// Reset the elapsed time to zero
	elapsedTime = 0;
}

// Grab the correct frame in the image strip by multiplying the currentFrame index by the Frame width

sourceRect = new Rectangle(currentFrame * FrameWidth, 0, FrameWidth, FrameHeight);

// Grab the correct frame in the image strip by multiplying the currentFrame index by the frame width

destinationRect = new Rectangle((int)Position.X - (int)(FrameWidth) / 2,
    (int)Position.Y - (int)(FrameHeight) / 2, (int)(FrameWidth * scale), (int)(FrameHeight * scale));
The sourceRect should be the portion of the spritesheet for this frame, and the destinationRect should be where it is drawn on the screen.
Adding the Animation Into Content Folder
Get the files needed from this zip file. It also contains the previous non animated player graphics. Extract it in the same way as before and add shipAnimation.xnb file into monogame.
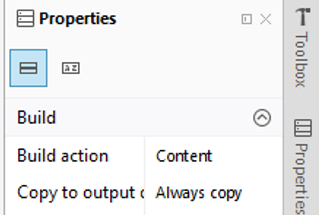
Once added, you need to right click on shipAnimation.xnb and chose properties. You should then change Build Action to Content, and the Copy to Output Directory to Copy Always:
Changing Game1.cs
The final change required is to switch the graphic currently in use. Have a look in the LoadContent method within the Game1.cs file, you need to alter the player.Initialize line to the following:
player.Initialize(Content.Load<Texture2D>("Graphics\\shipAnimation"), Vector2.Zero);
If you get any errors concerning module not found or file not found, right click on the shipAnimation.xnb and select properties. Remember to check the Build Action to Content and the Copy to Output Directory to Copy Always.
