Love - Using a TMX Map
Contents
Advanced Tiled Loader
Have a look at his GitHub repository:
It was initially an abandoned project, but with a little bit of work is fully working again. It will be suitable for students creating an RPG style game.
Setup
You can download the zip file from this link: download
Extract the zip and copy the 'Advanced-Tiled-Loader' folder into your LOVE project folder (same directory as the 'main.lua').
In your TMX map, create an object on an object layer called 'Player'.
Copy this code for the 'main.lua'
local player = nil -- variable to store player
function love.load()

  local loader = require("Advanced-Tiled-Loader.Loader")
  loader.path = "Maps/"  --Change this to wherever your .tmx files are
  map = loader.load("untitled.tmx") --Change this to the name of your mapfile
  tx = 0
  ty = 0
  scale = 2 -- Adjust zoom with this

  image=love.graphics.newImage("Maps/test.png") --Image to use for player

  -- This will go through the layers in the map, find the object layer and the player object
  for _, layer in pairs(map.layers) do
   if layer.class == "ObjectLayer" then
		for _, obj in pairs(layer.objects) do
			if obj.name == "Player" then
				print(obj.name)
				obj.texture = image -- give it a texture
				map.camera.Object=obj -- set the camera to follow this object
				map.camera:update() -- update the camera position
				player=obj -- pass the object and store it has player
			end
		end
   end
  end
end

-- code to draw the map
function love.draw()
  local ftx, fty = math.floor(tx), math.floor(ty)
  love.graphics.push()
  love.graphics.scale(scale)
  love.graphics.translate(ftx, fty)
  map:draw()
  love.graphics.pop()
end

-- update method to move the player object
function love.update(dt)
	local difx = 0
	local dify = 0
	change = false

	if love.keyboard.isDown("up") then
		dify=100*dt
		change = true
		end
	if love.keyboard.isDown("down") then
		dify = -100*dt
		change = true
		end
	if love.keyboard.isDown("left") then
		difx= 100*dt
		change = true
		end
	if love.keyboard.isDown("right") then
		difx= -100*dt
		change = true
		end

	player.x = player.x-difx
	player.y = player.y-dify

	if change==true then
		map:forceRedraw() -- this will force the map to redraw after movement
		end

end
Loading A Collision Tile Layer
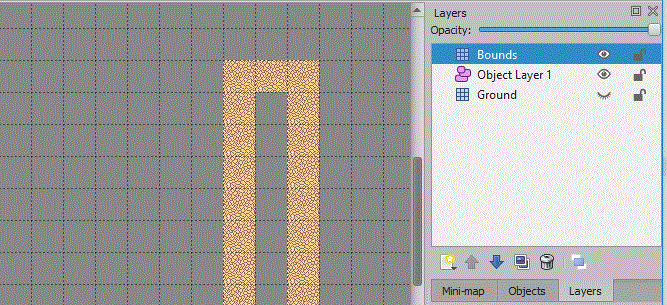
First, you will need to create a new 'Tile Layer' in tiled. This will represent the tiles you will collide with. This layer can be at the very back and hidden by your other layers. This is my example:
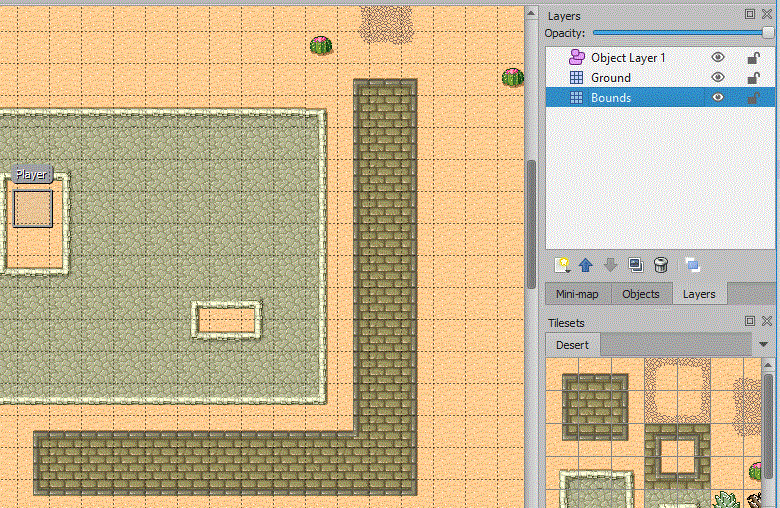
I have created a layer called 'Bounds', this layer includes a tile in prevent moving through the wall (see the image below of the rest of the map):
The image above shows the wall and that my bounds layer is behind the main layer. This will hide the bounds layer.
Now to load this layer into your game, in the 'function love.load()' add the following line:
bounds=map.layers["Bounds"]
Checking for Tile Collision
Now find the 'function love.update()' you should have the following lines from the previous section to setup your tmx map in love:
player.x = player.x-difx
player.y = player.y-dify
These lines will move the player to the new position. We will now check that the new position is still in bounds. So add the following if statement after these two lines to get this:
player.x = player.x-difx
player.y = player.y-dify

if checkbounds()~=true then
    player.x = player.x+difx
    player.y = player.y+dify
end
Remember in lua '~=' means not equal. We will now create a new method called check bounds. So add this new function into your code:
function checkbounds()
    test = true
    return test
end
A this point, run your game to make sure you can still move. Then change the line 'test = true' to 'test = false'. Setting test to false should stop your player from moving all together.
Now in the cheeckbounds function, and after the 'test=true' line add this to record the player location and size:
function checkbounds()
    test = true
    playerrec = {X=player.x+5, Y=player.y,W=20,H=32}
    return test
end
I have used the value of 32 for the width and height of the player. You could also tweek these better suit your character, for example if you character is slim you could add 5 to the player X value and set the player width to 22 (ie remove 5 pixels from both sides).
Now we need to iterate through every tile in the bounds layer, so add the for loop below:
function checkbounds()
    test = true
    playerrec = {X=player.x+5, Y=player.y,W=20,H=32}
    for x, y, tile in bounds:iterate() do

    end
    return test
end
Now inside the for loop create another structure to hold the position and size of this tile:
function checkbounds()
    test = true
    playerrec = {X=player.x+5, Y=player.y,W=20,H=32}
    for x, y, tile in bounds:iterate() do

        tilerec = {X=x*32, Y=y*32,W=32,H=32}

    end
    return test
end
The above code uses the tile width and height of 32, yours may be different.
Now to test if they intersect:
function checkbounds()
    test = true
    playerrec = {X=player.x+5, Y=player.y,W=20,H=32}
    for x, y, tile in bounds:iterate() do

        tilerec = {X=x*32, Y=y*32,W=32,H=32}

        if  (playerrec["Y"] + playerrec["H"]  >  tilerec["Y"] )  and ( playerrec["Y"]  < tilerec["Y"] + tilerec["H"] )  and
		(playerrec["X"] + playerrec["W"]  >  tilerec["X"] )  and ( playerrec["X"]  < tilerec["X"] + tilerec["W"] ) then
            test = false
	end

    end
    return test
end
You should now collide with any tile in your bounds layer.
Collectables
In your object layer add some more objects, the image below shows the objects I have created. Notice that i have given each object a name, but the key is i have also given each one a type:
You will need to have a sprite for each type of object, I will use a sprite for a coin, a key, and a heart for the health. You will need to store these sprites within your project folder. So within the 'function love.load()' add the following lines to read in your sprite images:
  coin = love.graphics.newImage("coin.png")
  heart = love.graphics.newImage("heart.png")
  key = love.graphics.newImage("key.png")
Make sure the above code is before the 'for' loop.
Now to give the objects on the map a texture. Find this section in the 'function love.load()':
for _, layer in pairs(map.layers) do
   if layer.class == "ObjectLayer" then
		for _, obj in pairs(layer.objects) do
			if obj.name == "Player" then
				print(obj.name)
				obj.texture = image -- give it a texture
				map.camera.Object=obj -- set the camera to follow this object
				map.camera:update() -- update the camera position
				player=obj -- pass the object and store it has player
			end
		end
   end
  end
The if statement 'if obj.name == "Player" then' will find the player object, remember we set the type of the collectables and we will use this instead. So after this 'if' statement add the additional code as below:
 for _, layer in pairs(map.layers) do
   if layer.class == "ObjectLayer" then
		for _, obj in pairs(layer.objects) do
			if obj.name == "Player" then
				print(obj.name)
				obj.texture = image -- give it a texture
				map.camera.Object=obj -- set the camera to follow this object
				map.camera:update() -- update the camera position
				player=obj -- pass the object and store it has player
			else
				if obj.type == "Coin" then
					obj.texture = coin
				elseif obj.type == "Key" then
					obj.texture = key
				elseif obj.type == "Health" then
					obj.texture = heart
				end
			end
		end
   end
  end
Your collectables should now appear on your map when you run the game.
Checking Collectables
We will need to create a new function called 'checkcollectables':
function checkcollectables()
	playerrec = {X=player.x, Y=player.y,W=32,H=32}
	layer = map.layers["Object Layer 1"]
end
To start with, above I have added the code to store the player position and also have loaded the object layer. Now we need to iterate through every object in the object layer, to do this you should get:
function checkcollectables()
    playerrec = {X=player.x, Y=player.y,W=32,H=32}
    layer = map.layers["Object Layer 1"]
    for _, obj in pairs(layer.objects) do
        if obj.name~="Player" and obj.visible then

        end
    end
end
The code above will iterate through each object, it will be called 'obj' within the for loop. I have also included a if state to make sure the object is not the player (the player will collide with itself) and also that the object is visible. When the collectable is collected we will make the visible = false.
Now inside the if statement we can check the position of the object and the player:
function checkcollectables()
    playerrec = {X=player.x, Y=player.y,W=32,H=32}
    layer = map.layers["Object Layer 1"]
    for _, obj in pairs(layer.objects) do
        if obj.name~="Player" and obj.visible then
            if  (playerrec["Y"] + playerrec["H"]  >  obj.y )  and ( playerrec["Y"]  < obj.y + obj.height )  and
                (playerrec["X"] + playerrec["W"]  >  obj.x )  and ( playerrec["X"]  < obj.x + obj.width ) then

                obj.visible=false
                print("Object collision")
            end
        end
    end
end
The added if statement above is taken from the checkbounds method, and I have changed it so that it uses the values from 'obj'. If we have collided with the collectable the object will be set to invisible by the code 'obj.visible=false'. Instead of just printing 'Object Collision' you could if the health was collected, increase the health in the game. If it was a coin you could add to the coin count within the game etc....
Other TMX Loader Options
For example the STI project: STI
Setup tutorial: Tutorial


