Ruminate Example
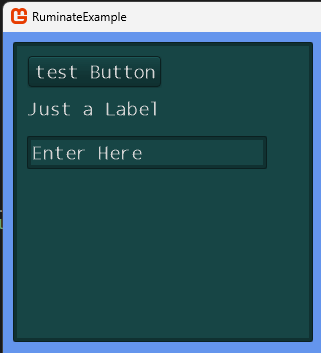
Example interface:
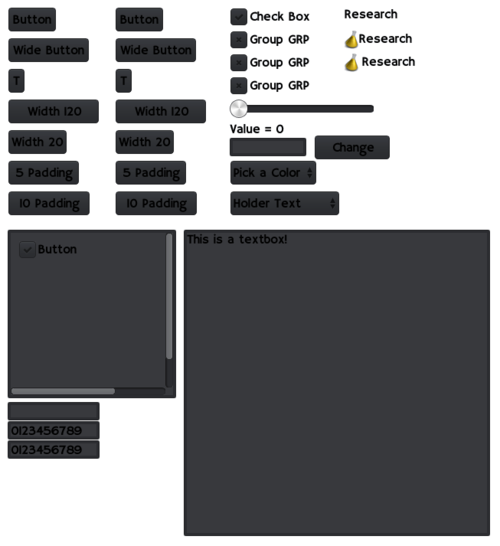
Available Components:
Contents
Installation
You need to visit the GitHub for the Ruminate project:
https://github.com/ClassicThunder/MonoGameGui
You can then download the code and place the GUI, GUI Content, and GUI Utils folders into the project folder (ie same location as Game1.cs).
Content Files
Now you need to download the following zip file which contains the content folder for Ruminate, you need to extract this into the content folder of your project:
https://drive.google.com/file/d/0Bw-0YEA_JX9gcFEyY1F2aXVJbGs/view?usp=sharing
You might also need to add these to the content pipeline, the zip file also includes the 'xnb' files so you can copy the content to the 'bin/Windows/x86/Debug/Content' folder.
Setup
You can follow the instructions below, or alternatively this link is for a working example of a Ruminate menu: https://drive.google.com/file/d/1-m7Xb5WrsWzpHl8zECkQBl2tLWyDuZ95/view?usp=sharing
Create a new screen
Create a new class from the project menu and name the class screen1. You need to add the following to the using section of the new class;
using Microsoft.Xna.Framework;
using Microsoft.Xna.Framework.Graphics;
using Ruminate.GUI.Content;
using Ruminate.GUI.Framework;
Edit the class declaration to make it a class of Screen:
class Screen{

}
Within the new class add the following variable:
Gui gui;
Now copy the following methods into the class:
 public void OnResize() {
     gui.Resize();
 }

 public void Update(GameTime time) {
     gui.Update(time);
 }

 public void Draw() {
     gui.Draw();
 }
the final method required is an Init method, create the following method:
 public void Init(Game1 game) {

      Color = Color.White;

      var skin = new Skin(game.GreyImageMap, game.GreyMap);
      var text = new Text(game.GreySpriteFont, Color.Black);

      gui = new Gui(game, skin, text);
      gui.AddWidget(
          new Panel(10,10,300,300)
          {
              Children = new Widget[] {
              new Button(10,10,"test"),
              new SingleLineTextBox(10, 50, 120, 10) { Value = "this can change"},
              new Label(10, 90, "Just a label")
          }
      });
 }
This will create a panel of 300x300 at an XY of 10,10. This panel will contain a button and a single line text box. This is an example of how you could create an interface, more interface components are detailed below.
Displaying a screen
Add the following variables into your Game1.cs:
Screen currentScreen;

public SpriteFont GreySpriteFont;
public Texture2D GreyImageMap;
public string GreyMap;
In the LoadContent method of Game1.cs add the following to load the textures and imagemap:
GreyImageMap = Content.Load<Texture2D>(@"GreySkin\ImageMap");
GreyMap = File.OpenText(@"Content\GreySkin\Map.txt").ReadToEnd();
GreySpriteFont = Content.Load<SpriteFont>(@"GreySkin\Texture");

currentScreen = new Screen();
currentScreen.Init(this);
In the update method of Game1.cs, enter the following code:
currentScreen.Update(gameTime);
in the draw method of Game1.cs, enter the following code:
currentScreen.Draw();
How can you use this
You could create a new class within your project for each screen you need to use. You will also need to create a parent class which they can all inherit. You could create an array of all the screens in your game:
Screen[] currentScreens = new Screen[] {
                new MainMenu(),
                new InputTest(),
                new LayoutTest(),
                new ButtonTest()
            };
You can create an instance of each screen in the elements of the array. So when you want to switch screens you can simply pass currentScreen a new value from the array and run the currentScreen.Init() again:
currentScreen = currentScreens[index];
currentScreen.Init(this);
A more detailed example, which could be in the Update section of your Game1.cs:
if (newState.IsKeyDown(Keys.Tab)) {
     if (index + 1 == currentScreens.Length) {
         index = 0;
         }
     else {
         index++;
     }
     currentScreen =  currentScreens[index];
     currentScreen.Init(this);
}
Enums
This is best used with Game states, if you create a public enum in the declaration section of Game1.cs:
public static enum GameState {
    MainMenu,
    GamePlay,
    EndOfGame
}
Now create a public variable set to one of the enum values in the declaration section of Game1.cs:
public static GameState state = GameState.MainMenu;
You can use this enum value to load the appropriate screen.
Switching Screens
One of your buttons could set:
Game1.GameState=Game1.GameState.GamePlay;
This is assuming the enum created is called GameState, and one of the options is GamePlay. Making the enum and the variable which uses it public means each screen could access and change the state of the parent game.
Other controls
new ToggleButton(0, 10, "Button")

new CheckBox(300, 10, "Check Box")

new RadioButton(300, 40, "GRP", "Group GRP")
new RadioButton(300, 70, "GRP", "Group GRP")]
new RadioButton(300, 100, "GRP", "Group GRP")

new ComboBox(300, 250, 131, "Holder Text", CardinalDirection.South, new List<ComboBox.DropDownItem> {
      new ComboBox.DropDownItem("Test 1"),
      new ComboBox.DropDownItem("Test 2"),
      new ComboBox.DropDownItem("Test 3"),
      new ComboBox.DropDownItem("Test 4"),
      new ComboBox.DropDownItem("Test 5")
                    }),
Using events
If you want to access the controls such as to change the value of a textbox or to read the value, you will need to declare the SingleLineTextBox within your screen first. So below Gui gui; in your subclass for a screen add:
SingleLineTextBox message;
you can then add:
message = new SingleLineTextBox(300, 180, 100, 10)
To your panel, in the above examples we have been assigning the SingleLineTextBox to anything, so we couldn't access it in our program. We can now add a button to change the message:
   new Button(410, 177, 100, "Change", delegate {
              message.Value = "Button Pressed";
              //You could add more lines to this button press event
              //You could even call a method
          }
    }),
An example for a combobox:
new ComboBox(300, 210, "Pick a Color", 2, CardinalDirection.North, new List<ComboBox.DropDownItem> {
         new ComboBox.DropDownItem("Violet", null, delegate { Color = Color.Violet; }),
         new ComboBox.DropDownItem("Tomato", null, delegate { Color = Color.Tomato; }),
         new ComboBox.DropDownItem("YellowGreen", null, delegate { Color = Color.YellowGreen; }),
         new ComboBox.DropDownItem("LightSkyBlue", null, delegate { Color = Color.LightSkyBlue; })
         }),

